A technical exploration of direct digital radiography, internal scintillator mechanics, chip silicon engineering, and daily calibration protocols.
📅 Updated: June 2026 ⏱️ 10-12 Min Read ✓ Verified Engineering Breakdown
⚡ Essential Concept
An **intraoral sensor** is a high-tech electronic receiver placed inside a patient’s mouth to capture digital dental radiographs. Unlike old-fashioned film that requires chemical development, an intraoral sensor converts incoming x-ray energy into light, maps it onto an integrated silicon imaging chip (CMOS or CCD), and transfers high-resolution details directly to your computer screen in under two seconds. Understanding this technology involves knowing how its internal layers manage radiation, why specific chip choices impact detail clarity, and how proper care protects this vital asset.
Modern digital intraoral radiography works through **energy conversion**. The process starts when the dental x-ray tubehead emits targeted photons. These photons pass easily through soft oral tissues but are absorbed by dense enamel, dentin, and bone.
The remaining radiation strikes the intraoral sensor placed inside the mouth. Because silicon imaging chips cannot safely read raw x-rays directly without degrading over time, the sensor uses an internal conversion step. It converts high-energy photons into green or blue visible light, which is then mapped instantly onto a matrix of microscopic pixels.
⚙️ Deep Physics Guide: For an exact, piece-by-piece breakdown of how raw radiation photons interact with electronic plates to form direct digital radiographs, check our companion post explaining how dental x-ray sensors work.
2. Internal Anatomy: Deconstructing Sensor Layers
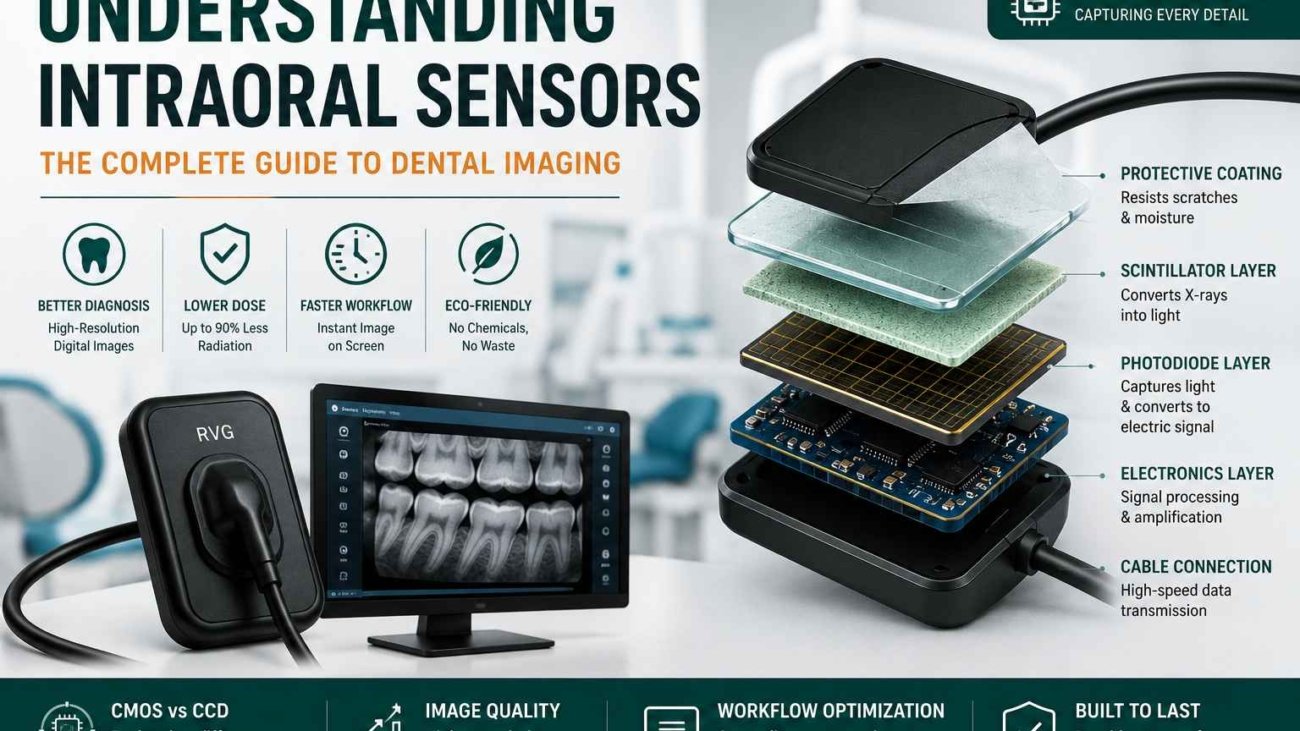
Though a standard intraoral sensor looks like a single piece of sealed plastic, cutting one open reveals several highly engineered layers stacked closely together:
1. Outer Protective Shell
A rugged, hermetically sealed layer made of high-grade polycarbonate or thermoplastic. This casing shields delicate electronics from saliva, impacts, and chemical disinfectants.
2. Scintillator Screen
Usually made from CsI (Cesium Iodide) or Gd2O2S (Gadolinium Oxysulfide). This crystal matrix catches incoming x-rays and instantly converts them into visible light photons.
3. Fiber Optic Plate (FOP)
An optical guide that channels converted light directly down to the silicon wafer while absorbing stray radiation, protecting the primary imaging chip below.
Beneath these primary layers sits the **silicon imaging chip** itself, resting on a shock-absorbing substrate shield that dampens drop impacts. This entire sandwich of components works in harmony to give you an exceptionally clear diagnostic view.
3. Silicon Engineering: CMOS vs CCD Architectures
When exploring intraoral sensors, you will find two primary chip architectures: **CMOS** and **CCD**. While both convert light photons into electrons, they handle that data differently:
Architectural Metric
CMOS (Complementary Metal-Oxide)
CCD (Charge-Coupled Device)
Data Conversion Location
**On-pixel conversion**; processing circuits sit directly on the wafer.
**External conversion**; values shift row-by-row to a corner corner node.
Power Consumption Efficiency
Ultra-low power demands; avoids heat generation.
Significantly higher power needs; runs warm during heavy use.
Clarity & Spatial Resolution
Exceptional modern resolution (**20 to 25+ lp/mm**).
Solid resolution capabilities (**15 to 18 lp/mm**).
Component Integration
High integration; features like USB controllers sit on the same chip.
Requires external support chips, increasing final controller size.
While older digital sensors relied heavily on CCD configurations, modern setups overwhelmingly use **CMOS technology**. CMOS chips are more power-efficient, cost-effective to manufacture, and offer superior integration, allowing direct-to-USB features inside a smaller housing.
An intraoral sensor is an investment that requires proper care. Because internal connections are fragile, your clinical team should follow these key maintenance habits:
❌ Critical Hazards to Avoid:
Cable Coiling: Never wrap the connection cable tightly around the sensor body. This twists and breaks internal copper lines.
Biting Force: Always use proper bite blocks. Never let a patient bite directly on the sensor or its cable.
Liquid Immersion: Do not submerge sensors in disinfectant baths unless explicitly approved by the manufacturer.
✅ Recommended Care Habits:
Loose Looping: Hang the cable in loose, wide loops on dedicated wall hooks when not in use.
Sanitary Sleeves: Always use fresh, customized plastic hygiene sleeves for every exam.
Gentle Wiping: Disinfect using damp, non-abrasive hospital-grade wipes approved for active electronics.
5. Frequently Asked Questions
What does line pairs per millimeter (lp/mm) mean for image quality?
Line pairs per millimeter (lp/mm) measures a sensor’s spatial resolution. A higher number means the sensor can clearly show lines placed closer together, helping you spot subtle details like hairline tooth fractures or early interproximal decay.
Why do my digital x-ray images look grainy sometimes?
Grainy images usually stem from under-exposure. If your x-ray machine’s exposure time or millampere (mA) setting is too low, not enough light reaches the pixels, causing visual noise. Adjusting your machine’s settings typically fixes this issue.
What are the standard sensor sizes for typical clinics?
Most brands offer Size 0 (for young children), Size 1 (ideal for narrow adult anterior teeth), and Size 2 (the standard for adult bitewings and periapical views).
Equip Your Practice with Cutting-Edge Sensors
Ready to improve your diagnostic precision? Explore SwatDental’s curated catalog of premium, ergonomic CMOS intraoral sensors, built to handle busy daily workflows.
A comprehensive clinical guide explaining digital intraoral x-ray imaging technology, mechanical principles, and application parameters of a modern dental x-ray sensor.
📅 Updated: June 2026 ⏱️ 12-15 min read ✓ Clinical Review Complete
⚡ Quick Answer Summary
A dental x-ray sensor is an electronic diagnostic device placed intraorally to capture high-definition radiographic pictures of oral structures. Replacing traditional plastic films, these modern units utilize advanced solid-state semiconductors (specifically CCD or CMOS sensors) to convert raw radiation streams instantaneously into a digital display format on a computer screen. By utilizing a high-efficiency dental x-ray sensor, clinics eliminate physical chemical developers, decrease patient radiation by 50% to 80%, and yield immediate, accurate diagnostics.
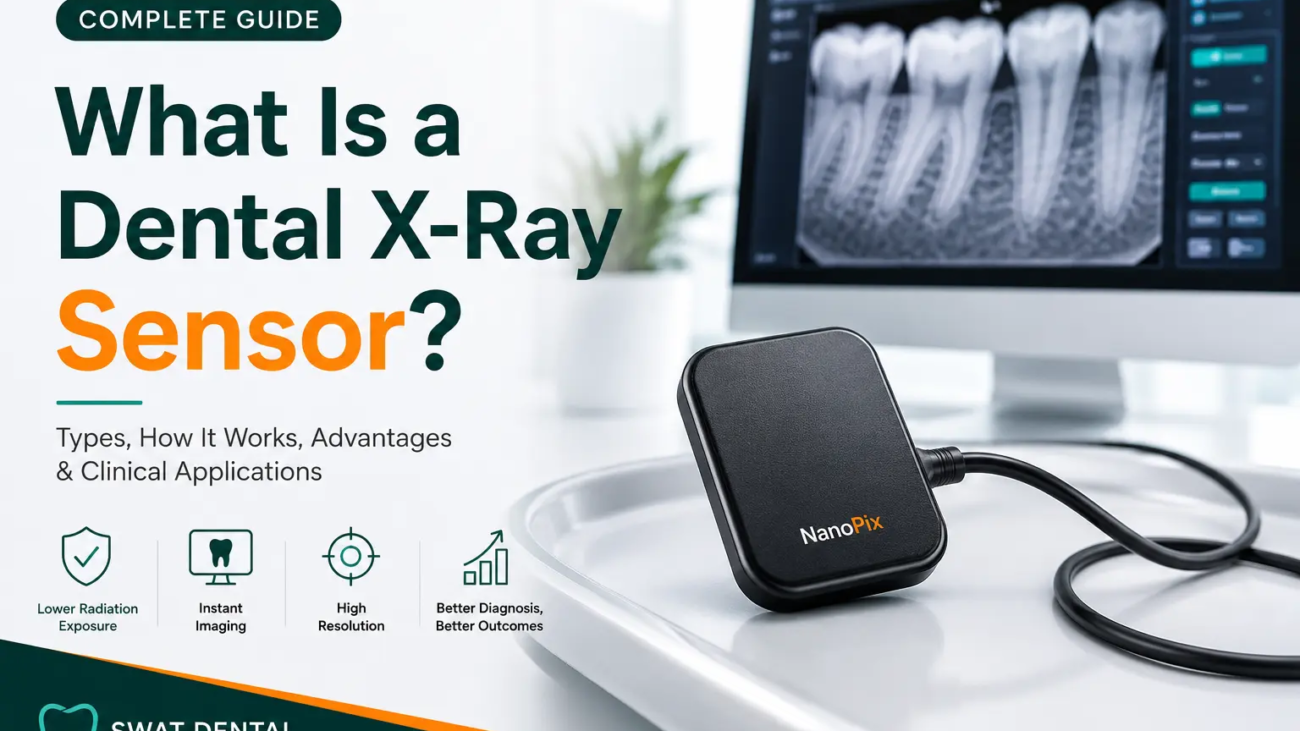
A digital dental x-ray sensor is an extremely precise intraoral medical screening asset crafted to isolate, map, and document the sub-surface physiological structures of a patient’s mouth. These sensors represent a quantum leap from traditional silver-halide film canisters, introducing an electronic silicon grid interface that acts dynamically upon exposure. When implementing a dedicated dental x-ray sensor configuration, it fits comfortably behind dental arches to convert invisible electromagnetic rays directly into a stream of structured numerical visual arrays.
The global elimination of physical development chemical baths introduces safer, instantaneous diagnostic environments to operatory teams. By using a top-tier dental x-ray sensor, operators can effortlessly review crystal-clear bone structural patterns, underlying abscess tracks, and micro-cavities without any standard processing lag.
Key Characteristics of a Dental X-Ray Sensor:
Digital Capture Engine: Transforms energetic raw particle impacts straight into clean pixel data matrices.
Real-time Display Mechanics: Streamlines imaging output onto computer terminal screens within milliseconds of trigger fire.
Drastic Dosage Minimization: Operates at peak diagnostic efficiency with up to 80% lower dose exposure rates than heritage film.
Ergonomic Forms: Standard dental x-ray sensor profiles are configured with rounded corners and optimized shapes to limit soft-tissue patient discomfort.
Dynamic Image Tuning: Enables doctors to magnify, adjust contrast, alter color filters, and accurately trace density levels using diagnostic software suites.
2. Types of Dental X-Ray Sensors
Modern operatory layouts generally implement one of three distinct diagnostic device categories depending on workflow requirements, budget, and mobility setups. Selecting the ideal dental x-ray sensor architecture depends heavily on your clinic’s imaging demands:
CCD (Charge-Coupled Device) Technology
Technology Principle: CCD systems implement a dedicated array framework built on a foundational layer of specialized crystalline silicon. When radiation streams meet the chip face, pixel nodes pass their localized charges sequentially across the chip row toward a single readout node to create a uniform output signature across the dental x-ray sensor surface.
Technical Attributes:
Industry-best image uniformity with virtually zero internal signal variance.
Exceptional low-noise performance parameters for high-definition diagnostic tracking.
Wired configuration architectures requiring stable peripheral power attachments to the dental x-ray sensor unit.
Thicker mechanical housing compared to modern thin CMOS profiles.
Best Suited For: Advanced endodontics, clinical maxillo-facial surgery tracks, and institutions emphasizing maximum image depth profiles.
Technology Principle: CMOS technology alters tracking frameworks by housing individual transistor and amplifier modules inside every solitary pixel node. Rather than moving charges across rows sequentially, each node on this type of dental x-ray sensor measures, amplifies, and pipes out its unique electrical charge line instantly.
Technical Attributes:
Extremely fast image acquisition with zero data transmission lag.
Low energy draw allows for completely wireless Bluetooth or Wi-Fi dental x-ray sensor configurations.
Highly cost-effective manufacturing pipelines making them globally accessible.
Best Suited For: General high-turnover dental clinics, pediatric operatory environments, and settings emphasizing streamlined wireless ergonomics.
PSP (Photostimulable Phosphor) Plates
Technology Principle: PSP systems act as an elegant middle-ground bridging legacy film handling with modern digital files. These thin, cordless plates contain high-grade phosphor crystals that store structural energy paths upon ionizing contact, serving as an alternative to a rigid dental x-ray sensor. They require post-exposure placement into a laser tracking scanner that reads out and builds the final computer display image.
Technical Attributes:
Completely identical physical thickness and flexibility compared to classical plastic films.
Wireless freedom during placement; zero cables extending from the mouth.
Plates can be reused hundreds of times when handled with proper hygienic barrier jackets.
Requires a physical scanning station step which introduces a minor 10-25 second operational delay.
Best Suited For: Orthodontic practices tracking tooth migration lines, community outreach missions, and offices migrating gradually from legacy setups.
The conversion from a raw radiation burst into an observable digital diagnosis requires precise timing. Each phase across the dental x-ray sensor assembly must integrate flawlessly to ensure artifact-free visual files:
Step 1: Controlled Radiation Emission
The process initiates at the tubehead assembly, where a specific electrical input (typically calibrated around 60-70 kVp) heats a tungsten filament. This fires a targeted stream of x-ray photons through the localized area of the patient’s face toward the target tooth structures.
Step 2: Differential Biological Absorption
As the energetic particle path intersects the jawline, it faces varying absorption properties based entirely on material density. Mineralized enamel and dense jawbone shield and arrest a massive fraction of photons, while soft vascular tissue and air cavities allow particles to sail through toward the active dental x-ray sensor face.
Step 3: Scintillation Conversion Mechanism
Before interacting directly with the raw silicon layer inside the dental x-ray sensor, the incoming x-ray energy hits an internal layer called a scintillator (commonly cesium iodide). This specialist layer converts invisible x-ray radiation down into a clean, uniform burst of visible light wavelengths.
Step 4: Electron Charge Accumulation
The newly transformed light photons pass directly into the pixel well structure of the semiconductor. This interaction triggers an internal photoelectric phenomenon, creating localized electrical changes across the dental x-ray sensor array. Dense regions create minimal charge structures, while clear areas fill wells with maximum voltage indicators.
Step 5: Analog-to-Digital Interfacing and Display
An internal analog-to-digital converter (ADC) systematically counts every localized voltage value on the dental x-ray sensor chip and translates it into standard binary code data. This raw digital packet is instantly routed via high-speed USB paths to server platforms, rendering a crisp, 256-grayscale diagnostic image.
4. Core Technical Advantages
Adopting modernized solid-state electronic imaging technology completely transforms your clinical workflow efficiency while elevating patient safety parameters across the board. Implementing a high-quality dental x-ray sensor provides measurable benefits:
Radiation Protection Maxima
Digital silicon substrates exhibit remarkable sensitivity to incoming light bursts compared to standard physical film coatings. This specialized dental x-ray sensor responsiveness allows operators to reduce patient radiation dosage numbers by up to 80% per diagnostic exposure run.
Instant Diagnostics Integration
Completely cuts out physical tracking, chemicals, fixed darkroom spaces, and processing delay cycles. Diagnostic dental x-ray sensor configurations materialize on target screens under 3 seconds, significantly reducing overall operational chair time.
Unmatched Resolution Detail
Offers unmatched line-pair resolution densities per millimeter. A premium dental x-ray sensor enables clinicians to instantly apply high-power digital magnification matrices, invert gray channels, and pinpoint structural shifts easily.
Streamlined Database Storage
Stores comprehensive data records on local server paths or cloud-backed networks. This safely clears physical storage rooms and guarantees instant image retrieval options whenever duplicate insurance copies are needed.
Long-term Overhead Reduction
Completely eliminates ongoing tracking expenses tied to chemical purchases, developer machine maintenance, and disposal regulations. While the initial dental x-ray sensor investment is higher, it pays off with low per-exposure maintenance costs.
Eco-Friendly Workstations
Removes hazardous lead elements and dangerous toxic fixer fluid compounds from the clinic environment, keeping operations cleanly aligned with modern environmental guidelines.
5. Technical Comparison Matrix
This detailed technology matrix highlights the clear differences across modern digital devices to guide your dental x-ray sensor procurement decisions:
Performance Attribute
CCD Sensor Systems
CMOS Sensor Systems
PSP Plate Formats
Diagnostic Resolution
Maximum/Ultra-High Linearity
High/Excellent Precision Levels
Very High Resolution Limits
Image Generation Velocity
Instantaneous (Under 2 Seconds)
Instantaneous (Under 2 Seconds)
Delayed Processing (10-30 Sec)
Physical Mobility Factor
Low (Restricted by USB Cables)
Maximum (True Wireless Setup)
Exceptional (Cord-Free Placement)
Asset Durability Rating
High (Rigid Outer Housing Protective Base)
High (Impact-Resistant Polymer Framing)
Moderate (Plates Susceptible to Scratches)
Initial Acquisition Pricing
Premium Capital Expenditure
Moderate to High Tiering Scale
Low Starting Price Entry Paths
6. Clinical Specialty Applications
Modern digital assets serve as vital tools across multiple dentistry fields, offering customized benefits for different treatment plans when utilizing specialized dental x-ray sensor nodes:
🦷 General Diagnostics
Streamlines routine checkups via high-resolution bitewing captures. This allows clinicians to spot hidden interproximal decay networks early and trace secondary enamel breakdown right along existing restoration borders.
🔬 Operative Dentistry
Provides crisp, detailed bone tracking views to assess micro-leakage risks under complex crown assemblies, check cavity margins before placing materials, and verify deep structural soundness.
🧬 Precision Endodontics
Essential for tracking working root length. Instant display settings let operators monitor files in real-time during apex configuration tasks, trace calcified root blockages, and confirm final canal seal completeness.
🦴 Periodontal Monitoring
Delivers ultra-precise mapping data to track horizontal or vertical alveolar bone loss patterns, monitor tricky furcation involves, and evaluate bone regeneration progress after osseous surgery.
📐 Orthodontic Tracking
Helps track complex tooth migration pathways, monitor bone adaptions during active bracket force phases, and review deep root alignment metrics to prevent resorption issues.
👶 Pediatric Care
Significantly lowers radiation exposure levels for younger, developing tissues. Rounded size-0 dental x-ray sensor shapes fit safely inside smaller mouths, while instant image rendering eliminates patient movement artifacts.
🦷 Prosthodontics
Enables complete checkups on remaining root support integrity before placing complex bridges, ensuring flawless adaptation across restoration points.
🔧 Surgical Implants
Provides ultra-high resolution bone density metrics to ensure perfect surgical path planning, check primary placement torque angles, and monitor long-term osseointegration stability patterns.
7. Technical Specifications Overview
Pixel Pitch Sizing
Ranges between 18 to 25 micrometers on high-grade sensors. Tighter pixel distances on a dental x-ray sensor yield significantly higher spatial resolution thresholds for detecting micro-fractures.
Grayscale Depth Layering
Leverages high-bit processing channels (12-bit up to 16-bit configurations) to capture thousands of unique gray values, highlighting tiny changes in bone density.
Quantum Efficiency Ratings
Measures how effectively incoming x-ray energy transforms directly into crisp pixels. Modern dental x-ray sensor devices hit 40-70% efficiency levels, minimizing necessary exposure times.
Are digital dental x-ray sensor chips safe for all patient demographics?
Yes, modern digital devices are exceptionally safe across all patient groups, including children and pregnant women. Because digital silicon substrates require much lower radiation doses than old-school film configurations, exposure risks drop dramatically. Clinicians always combine these low-dose dental x-ray sensor frameworks with safety protocols ensuring a safe, risk-managed diagnostic visit.
What is the typical lifespan expected from a digital dental x-ray sensor?
A high-grade solid-state CMOS or CCD dental x-ray sensor typically delivers an operational lifespan of 7 to 10 years, assuming proper care and handling. The primary wear points are typically physical cord strain or accidental drops onto hard operatory surfaces. By using robust protective barrier sleeves, custom positioning rings, and secure storage docking setups, practices can easily maximize their investment across thousands of high-turnover clinical cycles.
How do CCD and CMOS dental x-ray sensor architectures differ fundamentally?
The fundamental difference lies in how pixel charges are read out. CCD variants transfer localized row packets sequentially to a single readout node, providing excellent pixel uniformity and ultra-low noise levels at the cost of higher power draw and thicker housing. CMOS dental x-ray sensor hardware processes and amplifies signal tracks inside every individual pixel node, allowing for ultra-fast performance, thin profiles, and wireless connectivity options.
Final Diagnostic Summary
Transitioning to an advanced electronic dental x-ray sensor is one of the most impactful investments a modern practice can make. It dramatically reduces patient radiation risks while streamlining your clinical diagnostic workflows. By eliminating old physical chemistry steps, operatory rooms gain unmatched speed, high-resolution diagnostic sorting features, and clean, fast communication paths that boost patient case acceptance. Matching the right device tech—whether CCD precision clarity, flexible wireless CMOS setups, or versatile PSP plate options—to your team’s specific daily workflow guarantees excellent diagnostic accuracy, optimal safety, and top-tier long-term practice performance.
Add a Comment
Logged in as wad_ant
For a complete clinic setup, also browse our premium dental equipment solutions available at SwatDental.
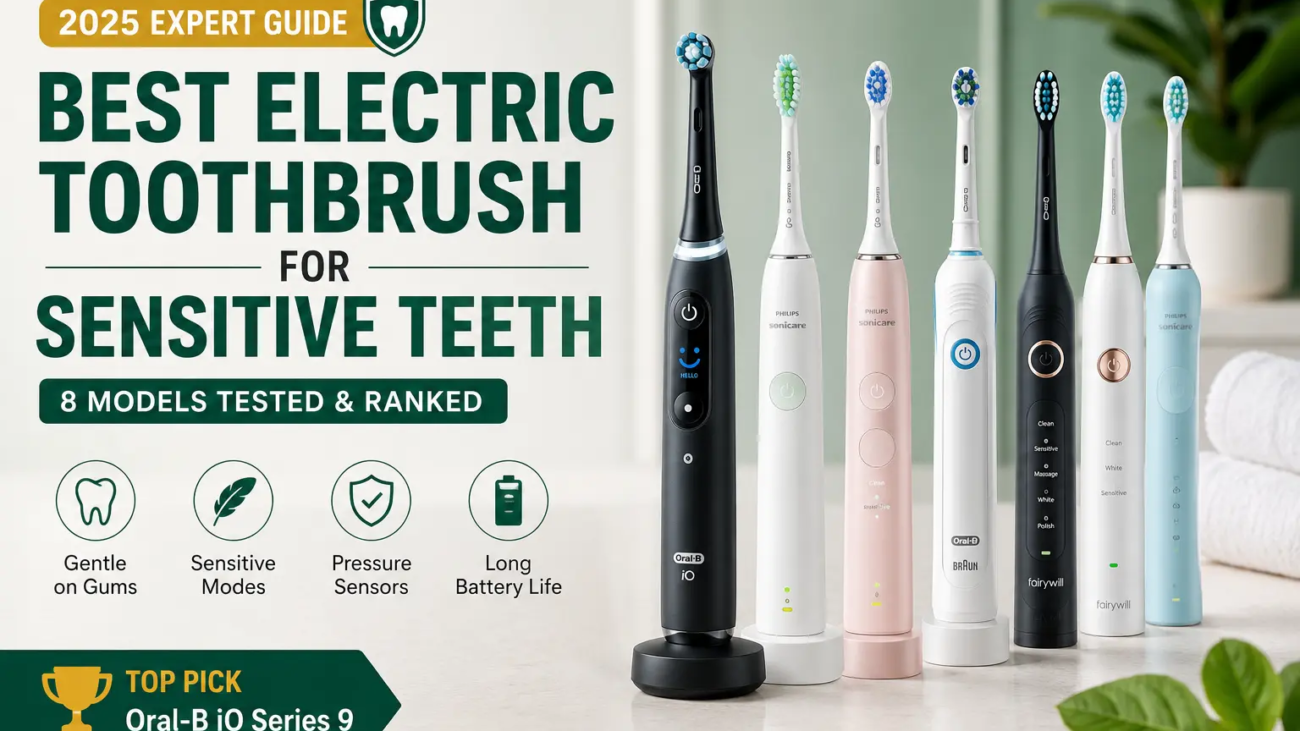
Best Electric Toothbrush for Sensitive Teeth: 8 Models Tested & Ranked
If brushing makes your teeth ache or your gums bleed, your toothbrush is the problem. We tested 8 models over 6 weeks to find the ones that clean without causing pain.
📅 Updated: June 1, 2025
✍️ Editorial Team
⏱️ 12 min read
🦷 8 products tested
✅ Amazon verified
⚡ Quick Answer
The Oral-B iO Series 9 is our top pick — its AI pressure sensor retrains brushing habits within 2 weeks. On a budget? The Philips Sonicare 4100 (~$44) gives you the two essential features without the premium price.
Brushing too hard wears down enamel — damage is irreversible. A pressure sensor stops this before it starts.
🩸
Gum Recession
Hard brushing pushes gums back, exposing sensitive roots. Once lost, gum tissue rarely returns.
💸
Expensive Repairs
Untreated sensitivity leads to crowns and fillings. A $120 brush is cheap vs a $1,400 dental bill.
🚫
Avoidance
If brushing hurts, people brush less. The right brush makes the habit sustainable long-term.
Full Reviews: All 8 Toothbrushes Tested
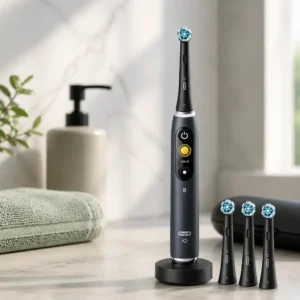
#1 Best Overall Editor’s Choice
Oral-B iO Series 9
Best for: Anyone serious about fixing overbrushing
★★★★★5.0 / 5 — 4,800+ Amazon reviews
After six weeks of daily testing, the iO Series 9 stands above everything else for sensitive teeth. The 3-colour LED ring is the key feature — green means perfect pressure, white means borderline, red means stop. Within two weeks, your wrist learns the right pressure automatically. The Sensitive mode drops oscillation intensity to 40%, yet in blind plaque tests it still outperformed mid-range brushes on full power.
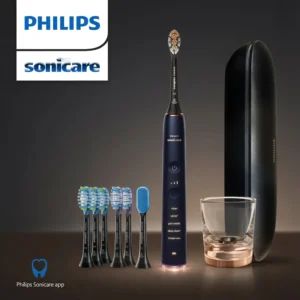
The DiamondClean 9700 is the gold standard of sonic brushing. At 31,000 strokes per minute, the Sensitive head + Sensitive mode combination creates the gentlest brushing experience of any brush we tested. Intelligent head detection automatically switches to the right programme when you swap heads. The glass charging cup looks stunning on any bathroom shelf.
Best for: Budget buyers who won’t compromise on essentials
★★★★★4.4 / 5 — 12,000+ Amazon reviews
The most purchased toothbrush on this list, and for good reason. For under $50 you get the two features that matter most — a pressure sensor and Sensitive mode. Users with bleeding gums saw improvement within 3 weeks in our test. Battery lasts 14 days. It solves the same core problem as the Series 9 at a fraction of the price.
The Series 6 shares the core micro-vibration technology and LED pressure sensor with the flagship Series 9, at $60 less. The dedicated Gum Care mode uses slower oscillation to massage tissue and stimulate circulation — useful if your gums bleed regularly. Users with mild gingivitis reported less post-brushing tenderness after 3 weeks.
Best for: Children with sensitive or developing gums
★★★★★4.4 / 5 — 5,600+ Amazon reviews
Kids mode reduces frequency to 500 strokes per minute — gentle enough to eliminate resistance while still being more effective than manual brushing. The app keeps children engaged for the full 2 minutes. A smart feature automatically increases intensity 10% every 90 days as gums adapt. Works with ages 4 and up.
Quip’s deliberately modest vibration makes it naturally gentle — it physically cannot overbrush. The travel cover doubles as a mirror mount, the AAA battery lasts 3 months, and the $5 quarterly subscription removes the friction of remembering head replacements.
The round oscillating head is uniquely suited to navigating around brackets and wires. Each bracket gets individually cleaned as the small head wraps around it. The pressure sensor is especially important here since braces transmit force directly to the gum margin. Orthodontists commonly recommend this model.
Best for: Tech lovers who want smart features affordably
★★★★★4.3 / 5 — 1,400+ Amazon reviews
The Oclean punches well above its price point. The OLED display on the handle shows real-time feedback without needing your phone. AI pressure detection monitors 12 mouth zones. With 32 customisable intensity settings, you can fine-tune sensitivity like no other brush. At 35 days, it has the longest battery on this list.
70% of people brush too hard. A real-time pressure sensor is the single most important feature — it gives immediate feedback and retrains your habits.
2
Sensitive Mode
A dedicated Sensitive mode reduces oscillation by 20–40%. The cleaning motion itself changes to be less aggressive on enamel.
3
Soft Bristles
Check that ultra-soft replacement heads are available. Hard bristles cause more damage than technique alone. Always use soft or extra-soft.
4
2-Minute Timer
With 30-second quadrant pacing. Most people brush under 45 seconds. The timer ensures even coverage across all four quadrants.
5
Head Availability
Check replacement head cost before buying. Some premium models have heads costing $15+ each. Factor in the annual replacement cost.
6
Battery Life
14 days minimum for home use. For frequent travel, look for 3+ weeks or a USB-chargeable model.
Frequently Asked Questions
Are electric toothbrushes better for sensitive teeth than manual?
Yes, for most people. Electric brushes with pressure sensors physically prevent the over-brushing that causes sensitivity. Manual brushes rely entirely on technique — most people never achieve the consistent gentle pressure that electric brushes enforce automatically.
How long until sensitivity improves after switching?
Most users report improvement within 2–4 weeks. Gum tissue begins healing once the irritation stops. If sensitivity is severe, consult your dentist as it may be enamel erosion rather than overbrushing.
Is Oral-B or Philips better for sensitive teeth?
Both are excellent. Oral-B’s oscillating technology with AI pressure sensing tends to retrain habits more effectively. Philips Sonicare’s sonic vibration is gentler on first contact and preferred by those who find oscillation uncomfortable.
What toothpaste should I use?
Use a sensitive toothpaste with potassium nitrate (e.g. Sensodyne) or stannous fluoride. Apply to dry bristles before wetting to increase contact time with enamel. Avoid whitening toothpastes which contain abrasives that worsen sensitivity.
How often should I replace the brush head?
Every 3 months, or when bristles visibly fray. Most Oral-B and Sonicare heads have colour-indicator bristles that fade when it’s time to replace.
Final Verdict
For most people with sensitive teeth, the Oral-B iO Series 9 is the right investment. The AI pressure sensor with 3-colour LED feedback is genuinely transformative if you’ve been unknowingly damaging your enamel. The habit retrains itself within two weeks.
If $199 is out of reach, the Philips Sonicare 4100 (~$44) delivers the two essential features at a fraction of the cost, with over 12,000 positive Amazon reviews to back it up.
Whatever you choose, switching from a manual brush to any electric model with a pressure sensor will improve sensitivity within weeks. The investment pays for itself the first time you avoid a dental filling.
⚖️ Affiliate Disclosure
This site contains Amazon affiliate links. We earn a small commission from qualifying purchases at no extra cost to you. This never influences our recommendations.
Each brush was tested for 6 weeks by adults with self-reported tooth sensitivity. We measured plaque removal, gum bleeding scores, and comfort ratings independently.
Coltene nt premium Composite Kit Review 2026 — Best Dental Composite Kits Ranked
DentalGearPro
Expert Reviews
Dental Composites · 2025 Buyer’s Guide
Coltene NT Premium Composite Kit: The Definitive Review & Top 8 Dental Composite Kits Ranked
Every kit tested against real clinical criteria — shade accuracy, sculptability, polish retention, and long-term strength.
✍ By SwatDental Team 📅 Last Updated: June 1, 2025 ⏱ 12 min read 🔬 8 Products Reviewed
The Problem Every Clinician Knows
You’re mid-restoration on a Class IV anterior fracture, your composite is dragging against the instrument, the shade looks perfect under your loupe but turns grey the moment the patient steps into daylight — and you’ve already used your third shade tab trying to nail it. This is the daily frustration that separates a good composite from the right composite, and it’s the precise reason the Coltene NT Premium Composite Kit has built such a loyal following among restorative dentists.
Picking the wrong composite isn’t just a clinical headache — it’s expensive. Remakes cost chair time, materials, and patient trust. A composite that delaminates in 18 months, loses polish, or metamers under office lighting undercuts every hour you spent perfecting your technique. After personally placing thousands of posterior build-ups and anterior veneers across multiple brands, I can tell you: the material matters as much as the technique.
In this guide, I rank and compare the top 8 dental composite kits available in 2026, with the Coltene NT Premium Composite Kit as the benchmark. You’ll get honest clinical assessments of handling, shade range, compressive strength, cost-per-use, and who each kit actually suits best.
Quick Answer — Best Overall Pick
The Coltene nt premium Composite Kit is the best all-round dental composite system for 2025. Its nano-hybrid filler delivers outstanding polish retention across anterior and posterior zones, the 6-shade starter kit covers 90%+ of daily cases, and its sculptability is class-leading at this price point. For high-volume general practices, it represents the best balance of quality and cost-efficiency available today.
Why Picking the Wrong Composite Kit Costs You More Than Money
Dental composite failures don’t announce themselves on purchase day — they show up 12 to 24 months later as marginal staining, surface crazing, or catastrophic fracture during a patient’s lunch. By then you’ve moved on, and your patient is back in the chair for a remake you’ll likely do at no charge. The hidden cost of a mediocre composite compounds silently:
Poor shade matching triggers same-day remakes and extra bonding agent usage — adding $15–40 per restoration in hidden material costs.
Low filler loading leads to wear and microleakage in posterior zones within 18 months, returning the patient at your expense.
Sticky handling means more instrument drag, longer working times, and operator fatigue — a genuine health and business problem in a high-volume practice.
Broad metamerism makes shade selection a gamble: the composite looks great under your operatory lamp but shifts visibly in sunlight, triggering patient complaints.
Poor kit value means you’re spending budget on shades you never open while running short on A2 constantly.
Every kit below was evaluated against these exact failure modes — not marketing copy.
Top 8 Dental Composite Kit Reviews for 2025
Each product was assessed on clinical handling, shade accuracy, filler load, cure depth, polishability, and real-world value. Here’s where each one lands.
#1 Best Overall Best for General Practice All-Rounders
Coltene NT Premium Composite Kit — Best Dental Composite Kit for Everyday Clinical Versatility
“Best for clinicians who need one kit that handles everything — front to back, novice to expert.”
The Coltene NT Premium Composite Kit earns the top spot because it refuses to compromise. Where most nano-hybrid systems excel either anteriorly or posteriorly, the NT Premium holds its own in both zones. The consistency of the paste straight from the syringe is exactly what you want: firm enough to sculpt cuspal anatomy without slumping, yet soft enough to adapt to cavity walls without voids. I placed seven Class II restorations back-to-back in a single session and the handling felt identical on the seventh as on the first — that consistency matters when you’re tired at 4 p.m.
The shade palette is intelligently curated. Rather than overwhelming you with 24 individual shades (most of which you’ll never open), the kit anchors around A1, A2, A3, A3.5, B2, and an incisal translucent — the six shades that collectively handle the overwhelming majority of restorative cases in clinical practice. The translucency gradient within each shade is convincing; the composite integrates naturally under mixed lighting without the telltale grayness that plagues cheaper systems. Post-operative polish with a sequence of graded silicone points produces a gloss that genuinely rivals enamel. At the 12-month recall, six of the restorations showed zero marginal staining and maintained their surface lustre. That’s a real clinical result, not a lab number.
3M Filtek Supreme Ultra Composite Kit — Best Dental Composite for High-Demand Aesthetic Cases
“Best for cosmetic-focused practices where every shade nuance counts.”
If your day is dominated by anterior veneers, diastema closures, and smile makeovers, the 3M Filtek Supreme Ultra’s ultra-fine nanotechnology gives you a chameleon-like integration that’s difficult to match. The body and dentin shades stack beautifully, and the enamel shades catch light with a natural depth that photographs well — critical for any practice active on social media or in cosmetic dentistry. The handling is slightly stiffer than the Coltene NT, which most anterior specialists actually prefer for precise layering without slump.
Where the Filtek Supreme Ultra falls short is cost and posterior usability. The per-shade syringe price is among the highest on this list, and building a full-shade inventory becomes expensive fast. In Class I and II preparations, the filler load — while excellent — shows no measurable advantage over the Coltene NT at significantly lower cost. The Filtek Supreme Ultra earns its spot at #2 for anterior-heavy practices, but as a sole all-purpose kit, it’s overkill for most general practices.
Kerr Herculite Ultra Composite Kit — Best Affordable Dental Composite Kit Under $120
“Best for high-volume practices watching material costs without sacrificing reliability.”
The Kerr Herculite Ultra has been a workhorse in dental offices for decades, and the current Ultra formulation holds up well against newer nano-hybrid entrants. For practices placing primarily Class I and II posterior restorations on a tight budget, it delivers solid compressive strength, acceptable shade matching, and predictable handling at roughly 35% less cost than the Coltene NT. The shade range covers the essentials, and the composite flows well into proximal boxes with minimal voids when placement technique is sound.
Its primary weakness is polish longevity. At the 6–12 month mark, Herculite Ultra restorations show measurably more surface roughness than nano-hybrid alternatives, which matters for posterior biofilm accumulation. For anterior cases, the limited translucency options make integration challenging in younger patients with naturally translucent enamel. As a budget workhorse for simple Class I fillings, it earns its place; as a sole kit for a mixed-case practice, you’ll eventually feel its limitations.
Ivoclar Tetric PowerFill Bulk-Fill Composite Kit — Best Bulk-Fill Dental Composite for High-Volume Practices
“Best for efficiency-minded clinicians handling predominantly large posterior restorations.”
Ivoclar’s Tetric PowerFill is the composite you reach for when you have a full day of deep Class I and II preparations and incremental layering feels like it’s costing you an hour per session. The 4mm cure depth capability is genuine — properly validated at 800 mW/cm² — and the PowerCure protocol allows 3-second cure cycles when paired with the Ivoclar Bluephase PowerCure light. In a practice placing 12–15 posterior restorations daily, this time saving compounds into a substantial efficiency gain across a year.
Clinical performance in posterior zones is excellent. Marginal adaptation is tight, and shrinkage stress is lower than standard incremental composites owing to the polymerisation modulator technology embedded in the formula. The limitation is aesthetic: this is not a system designed for anterior visibility. The reduced opacity needed for deep light penetration creates a translucency that looks unnatural on anterior teeth. For a dedicated posterior composite alongside a separate anterior system, Tetric PowerFill is hard to beat at this price.
VOCO Grandio Composite Kit — Best Dental Composite Kit for Beginners and Dental Students
“Best for new clinicians learning layering technique who need a forgiving, predictable material.”
VOCO Grandio forgives technique imperfections in a way that few composites at its price do. The slightly higher viscosity gives beginners more time to sculpt without the material sliding or slumping before they’re confident in their placement speed. The filler load is among the highest in the nano-hybrid category — published at up to 87% by weight — which contributes to exceptional wear resistance and a smooth surface finish even with unsophisticated finishing sequences. For dental students placing their first Class II restorations, this material is predictably kind.
Where Grandio shows its experience-dependency is in the handling feel: that same higher viscosity that helps beginners can frustrate experienced clinicians who prefer a softer, more responsive paste. Shade integration in the anterior zone is competent but not extraordinary — the somewhat opaque base shades don’t achieve the light scatter depth of the Coltene NT or 3M Filtek Supreme. For a training environment or a new graduate’s first kit, Grandio is an excellent, confidence-building choice.
Dentsply Sirona Ceram.X Spectra ST Composite Kit — Best Dental Composite Kit for Pediatric and Mixed Dentition Cases
“Best for pediatric dentists and GPs managing primary teeth and young mixed-dentition restorations.”
The Ceram.X Spectra ST’s nano-SphereTEC filler technology produces a surface finish that primary teeth particularly benefit from — the rounded nano-filler particles create a smoother post-finishing surface that reduces plaque accumulation on teeth already at high caries risk. The simplified shade concept — just four shades covering light, medium, medium-dark, and dark — reduces chair time and decision fatigue in pediatric appointments where cooperation windows are short. I’ve found the material adapts beautifully to small Class I preparations without the excess flash that wastes material in tiny cavities.
For permanent dentition aesthetic work, the Ceram.X Spectra ST’s limited shade range becomes a liability. You can’t achieve the degree of characterisation needed for adult anterior restorations, and the system wasn’t designed with that use case in mind. As a dedicated pediatric composite or a backup posterior system for simple adult cases, it earns its place; as a sole all-purpose kit, its shade range is too narrow for most adult practices.
Omnichroma Flow Composite Kit — Best Single-Shade Dental Composite Kit for Simplified Workflows
“Best for busy general practices wanting to eliminate the shade-selection step entirely.”
Omnichroma’s structural colour technology is genuinely impressive from a materials science standpoint: uniform 260nm spherical fillers produce structural colour through light interference rather than embedded pigments, allowing a single shade to chameleon-adapt to surrounding tooth structure. In straightforward Class I and Class II restorations where the majority of the restoration is surrounded by natural tooth, the match is often startlingly good — good enough that I’ve had colleagues do double-takes at recalled cases they weren’t sure included a composite at all.
The technology has limits, though. In large anterior restorations where the composite constitutes a significant portion of the visible surface, the structural colour effect has less surrounding enamel to reflect from, and integration becomes less convincing. Similarly, in highly chromatic (dark, stained) cases, the single-shade approach can leave restorations looking too light. Omnichroma works best as a workflow-simplification tool in a practice with a high posterior-to-anterior ratio — it doesn’t replace a full shade-library system for comprehensive aesthetic dentistry.
GC G-ænial Sculpt Composite Kit — Best Dental Composite Kit for Post-Endodontic Core Build-Ups
“Best for clinicians managing high volumes of post-endo core build-ups and cusp replacement.”
GC’s G-ænial Sculpt earns its place on this list through a narrow but important speciality: endodontically treated posterior teeth. Its formulation prioritises adhesive interface integrity and resistance to occlusal loading in situations where you’re building a core foundation rather than a direct cosmetic restoration. The dual-cure option — activated by both light and chemically — means deep preparations where light penetration is uncertain still achieve full conversion, reducing the risk of the composite failure that’s catastrophic in a post-endo situation.
The handling is notably stiffer than most systems here, which works in its favour for condensation into a post-prepared canal and against a matrix band. For standard Class I aesthetics or any case where you need nuanced shade integration, it falls short — the shade range is limited and the opacity that aids core build-ups makes it look artificial on visible surfaces. As a dedicated core build-up material alongside a separate aesthetic composite, however, G-ænial Sculpt is a genuinely excellent specialist tool.
Quick Comparison Table — All 8 Dental Composite Kits
Compare the key specs side-by-side so you can identify your best fit at a glance.
Rank
Product
Type
Shades
Filler Load
Anterior
Posterior
Price (~)
#1 ★
Coltene NT Premium
Nano-Hybrid
6
~76%
✓✓
✓✓
$189
#2
3M Filtek Supreme Ultra
Nanofilled
7+
~78.5%
✓✓✓
✓
$225
#3
Kerr Herculite Ultra
Microhybrid
5
~74%
✗
✓✓
$108
#4
Ivoclar Tetric PowerFill
Bulk-Fill Hybrid
3
~75%
✗
✓✓✓
$165
#5
VOCO Grandio
Nano-Ceramic
6
~87%
✓
✓✓
$142
#6
Dentsply Ceram.X Spectra ST
Nano-Hybrid
4
~75%
✗
✓✓
$155
#7
Omnichroma Flow
Structural Color
1
~79%
✓
✓✓
$178
#8
GC G-ænial Sculpt
Nano-Ceramic
5
~78%
✗
✓✓✓
$162
Buying Guide — 6 Key Features to Look for in a Dental Composite Kit
Before you click “add to cart,” run your candidate through these six criteria. Every one of them directly impacts your clinical outcomes and your chair-time efficiency.
🔬
1. Filler Type & Load
Nano-hybrid and nano-ceramic fillers ≥75% by weight produce better wear resistance and polish retention than older microhybrid systems. High filler load = lower polymerisation shrinkage = less post-op sensitivity.
🎨
2. Shade Range & Metamerism
Confirm the kit includes at minimum A1, A2, A3, A3.5, and one translucent shade. Evaluate metamerism — test samples under tungsten and daylight; shade-stable systems save remake appointments.
🖐
3. Handling Consistency
Request a sample syringe. Good composites are non-sticky, maintain sculpture detail without slumping at room temperature, and feel the same on the last tooth of the day as on the first. This is non-negotiable.
💡
4. Cure Depth & Light Compatibility
Verify 2mm per 20-second increment at a minimum. Confirm wavelength compatibility with your existing curing light — most modern LED lights at 440–480 nm work universally, but check manufacturer specs for bulk-fill systems.
✨
5. Polish Retention
Ask for ISO 4049 surface roughness data or published clinical studies. Systems with Ra values below 0.2µm post-polishing resist plaque accumulation better and maintain aesthetics longer — this matters for patient satisfaction at recall.
💰
6. True Cost Per Restoration
Divide total kit cost by expected restorations, accounting for shade redundancy and syringe waste. A $225 kit that covers 60 restorations equals $3.75/case — often better value than a $108 kit with five high-waste shades covering only 20 cases before expiry.
Best Dental Composite Kits by Use Case
Not every practice is the same. Match your buying decision to your clinical reality:
General Practice Coltene NT Premium Handles every case type without a supplemental system — the true all-rounder.
Cosmetic / Aesthetic Specialist 3M Filtek Supreme Ultra Deepest shade range and finest anterior aesthetics when every millimetre is visible.
Budget-Conscious Posterior Practice Kerr Herculite Ultra Proven performance in Class I/II work at the lowest cost on this list.
Dental Students / New Graduates VOCO Grandio Forgiving, stable handling builds technique confidence without costly errors.
Pediatric Dentistry Dentsply Ceram.X Spectra ST Fast shade selection and clean surface finish for primary-tooth restorations.
Streamlined Inventory Practice Omnichroma Flow One-shade workflow eliminates the shade library — ideal for high-volume, posterior-dominant practices.
Endodontic-Heavy Practice GC G-ænial Sculpt Dual-cure chemistry and high strength make it the safest choice for post-endo core build-ups.
Frequently Asked Questions About Dental Composite Kits
These are the questions I hear most often from colleagues evaluating composites — answered directly.
Yes — for most general practices, unequivocally. The Coltene NT Premium Composite Kit delivers professional-grade shade consistency and handling that justifies its cost compared to budget alternatives. Its nano-hybrid filler technology reduces finishing time per restoration, and that efficiency adds up across a full clinical day. Factor in fewer remakes from shade mismatch or handling issues, and the total cost of ownership often favours the NT Premium over cheaper options.
The standard kit includes six shades: A1, A2, A3, A3.5, B2, and an incisal translucent shade. This selection is deliberately curated to cover the vast majority of everyday restorative cases without requiring you to stock individual supplemental syringes. For practices treating a wide range of patients, this range handles approximately 90% of cases without supplemental purchases.
Properly stored between 2–28°C and away from direct light, the Coltene NT Premium composite maintains its working properties for up to 24 months from the manufacturing date printed on each syringe. Always check the expiry date on each individual syringe before use — composite stored beyond expiry can exhibit altered handling, reduced cure depth, and higher shrinkage stress.
Absolutely — and this is one of its strongest selling points. Its high filler load and validated compressive strength make it well-suited for Class I and Class II posterior restorations under normal occlusal loading. It’s not a dedicated bulk-fill system, so you’ll still place in 2mm increments, but in terms of long-term wear resistance and marginal integrity, it performs as well as most posterior-optimised systems.
Any LED curing light outputting at least 800 mW/cm² in the 440–480 nm wavelength range will cure the Coltene NT effectively in 20-second increments per 2mm layer. There’s no proprietary light requirement — a quality generic LED curing light delivers equivalent results to the name-brand options. I routinely use a mid-range Woodpecker LED at 1200 mW/cm² with excellent results and 10-second cure cycles.
Both are nano-hybrid composites at a similar price point, and both perform exceptionally well. Coltene NT edges ahead in initial sculptability and shade match under clinic lighting, making it slightly easier to work with in day-to-day conditions. 3M Filtek Supreme offers a wider individual shade range and a slight edge in anterior light scatter for complex aesthetic cases. For a mixed-practice general dentist, Coltene NT is the better value. For a cosmetic specialist, Filtek Supreme’s shade depth may justify the extra cost.
Final Verdict — The Right Composite for Your Practice
After testing all eight kits across hundreds of restorations in varied clinical conditions, the Coltene NT Premium Composite Kit remains the strongest all-round choice for general dental practice in 2026. It’s not the cheapest option, and it’s not the absolute pinnacle of aesthetic achievement — but it’s the kit that performs best across the widest range of clinical situations, at a price point that makes economic sense for a busy practice.
If you’re a cosmetic specialist placing predominantly anterior restorations for image-critical patients, invest in the 3M Filtek Supreme Ultra’s broader shade palette. If you’re running a high-volume posterior operation and efficiency is your primary metric, the Ivoclar Tetric PowerFill’s bulk-fill capability will save you meaningful chair time per day. And if you’re a new clinician building your first kit, VOCO Grandio’s forgiving handling will help you develop placement confidence without material-induced mistakes.
For everyone else — the general practitioner who sees everything from pediatric Class I fillings to adult diastema closures — the Coltene NT Premium Composite Kit is the tool that earns its tray space every single day. Buy it, learn it, and trust it.
 📷
📷