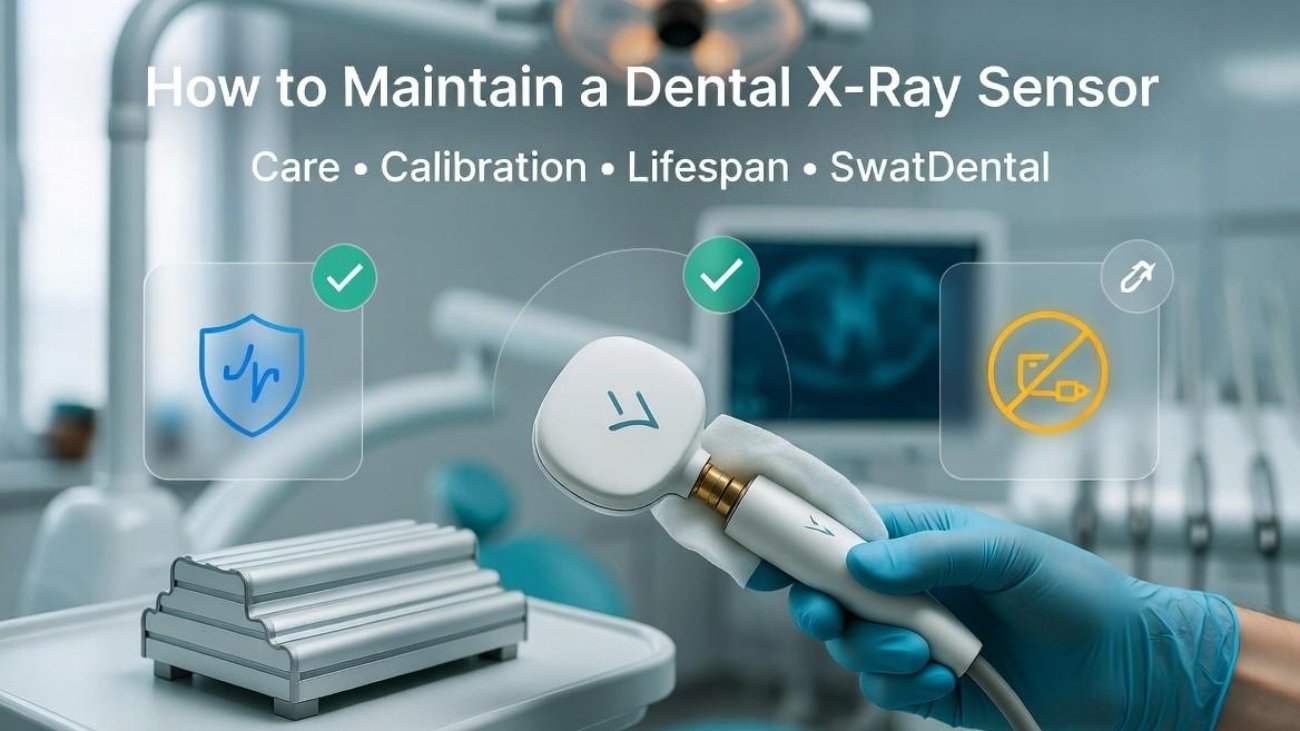
How to Maintain a Dental X-Ray Sensor

How to Maintain a Dental X-Ray Sensor: Care & Calibration Guide


How to Maintain a Dental X-Ray Sensor: Care & Calibration Guide


CLINICAL EQUIPMENT MAINTENANCE

How to Maintain a Dental X-Ray Sensor

The definitive engineering guide for dental practices. Prevent image degradation, protect delicate internal components, and extend your digital sensor’s clinical lifespan.

📅 Updated: June 2026
⏱️ 11-13 Min Read
✓ Biomedical Engineering Standards

The Importance of Sensor Maintenance

Digital intraoral X-ray sensors (whether using CMOS or CCD technology) are among the most expensive and highly sensitive pieces of equipment in modern dental practices. They undergo high-volume clinical handling, constant exposure to oral moisture, and repetitive chemical disinfection between patients. Because they contain delicate electronics, fiber-optic layers, and specialized silicon components, poor handling can quickly lead to costly image artifacts, connection failures, or total electronic breakdown. Knowing how to maintain a dental X-ray sensor through proper handling, careful chemical sanitation, and correct storage protects your clinical accuracy and shields your practice from unexpected replacement costs.

1. Safe Infection Control & Chemical Disinfection

Digital intraoral sensors cannot be autoclaved or heat-sterilized, meaning they must be protected by a physical barrier and disinfected with appropriate clinical chemicals after every single patient encounter.

Always Use Custom Barriers

Always place a clean, FDA-approved plastic barrier sheath over the sensor and down the first few inches of the cable before placement in the patient’s mouth. Double-sheathing can be helpful for pediatric or high-saliva cases to guarantee a dry seal.

Wipe, Never Submerge

Clean the sensor housing and cable using professional, non-abrasive hospital-grade disinfecting wipes. Never submerge an X-ray sensor in cold sterilization liquid unless the manufacturer explicitly states the housing is rated for IP67 or IP68 complete immersion.

Avoid Aggressive Chemicals

Avoid using harsh cleaning chemicals like highly concentrated bleach, acetone, or pure ketone compounds. These solvents dissolve the structural bonding glues along the sensor casing edges, letting saliva leak directly into the electronics.

2. Proper Cable Management & Stress Prevention

The copper wiring inside a sensor cable is extremely fine. Roughly **70% to 80% of premature sensor failures** happen because the cable is kinked, twisted, or pulled away from the main housing. Protecting the cable connection is critical for extending the sensor’s lifespan:

  • Avoid Tight Taping or Wrapping: Never wrap the connection cable tightly around your sensor wall mount, PC monitor, or X-ray tube head. Instead, loop the cable loosely in large, wide circles (at least 4-6 inches in diameter) to prevent internal wire braiding from snapping.
  • Watch the Floor Paths: Ensure the sensor cable never trails across the office floor. Rolling a heavy dental stool over an exposed cable can crush the internal shielding instantly, causing communication drops and permanent image static.
  • Unplug via the Connectors: When disconnecting a USB sensor from the operatory computer, never pull on the long cable itself. Grip the rigid plastic USB connector plug directly and slide it straight out to avoid damaging the computer port or the wire anchoring points.

3. Optimal Handling and Storage Protocols

A safe, standardized storage environment reduces the risk of physical drops or accidents when the sensor is not being used to capture images:

Utilize Dedicated Wall Holders

When a sensor is not actively being used, place it in a custom, molded silicone wall basket or cradle. Leaving a loose sensor sitting on a tray table makes it easy to accidentally knock off onto the hard office floor, which can crack the delicate internal fiber-optic plates.

Protect from Countertop Weights

Never stack heavy metal instrument boxes, hygiene trays, or diagnostic tools directly on top of your sensor units. Concentrated pinpoint weight can crush the delicate CMOS pixel matrix, creating blank spots or dead pixels on your diagnostic images.

4. Quality Assurance Calibration & Testing

Over time, continuous radiation exposure causes slight shifts in how individual pixels react. Regular system calibration updates keep your contrast balance sharp and ensure accurate diagnostic files:

Maintenance Step Recommended Clinical Interval Biomedical Purpose & Technical Impact
Visual Inspection Daily (Morning Routine) Checks for visible cracks in the outer casing, bite marks, or cable fraying before patient use.
USB Port Cleaning Monthly Interval Clears out dust and debris using compressed air to maintain a stable connection with the software.
Software Calibration Bi-Annually / Yearly Applies standard gain files inside the imaging software to balance pixel variations and prevent image ghosting.
Step-Wedge Phantom Test Annually Exposes a uniform aluminum block to confirm proper gray-scale resolution and check sensor density metrics.

🔍 Deep Equipment Knowledge: Curious about the inner electronic layers you are protecting during daily care? Check out our complete technical companion article explaining how dental x-ray sensors work to see how internal scintillators convert radiation lines into clinical data.

5. Troubleshooting Common Sensor Issues

If your imaging software suddenly shows connection errors or artifacts, walk through these basic technical checks before calling out a field repair technician:

  • “Sensor Not Found” Errors: Disconnect the USB line, reboot your imaging software workstation, and plug the connector into a different USB main port directly on the computer tower. Avoid using unpowered external USB extension hubs, as they often fail to supply enough current to start the sensor.
  • White Lines or Fixed Spots on Images: This often indicates either a scratching issue or dead pixel clusters caused by impact drops. Run an empty, low-exposure calibration shot to determine if the lines are permanent hardware defects or simply temporary artifacts in the software settings.
  • Intermittent Communication Drops: If the sensor disconnects only when the cable is moved, the internal wire shielding is likely worn or frayed. Stop using the device to prevent an electrical short, and send the unit out to a certified laboratory for a professional cable replacement.

Find Certified Diagnostics & Dental Equipment Supplies

Need high-durability digital X-ray sensors, custom wall mounts, replacement sleeves, or professional technical support? SwatDental provides dental practices with high-performance digital imaging equipment and support services.
ARTICLE EXECUTIVE SUMMARY

This technical maintenance page provides dental teams with practical protocols for cleaning, handling, and storing intraoral X-ray sensors safely to optimize diagnostic precision and prevent component breakdown.

EQUIPMENT POLICY DISCLAIMER

Always cross-reference maintenance routines with your specific hardware manufacturer’s user manual. SwatDental is not responsible for warranty issues stemming from non-compliant third-party chemical cleaners.

© 2026 SwatDental. All rights reserved. | Biomedical Imaging Diagnostics | Asset Support Platform


Root canal procedure explained

Root Canal Procedure Explained: Step-by-Step Patient Guide


Root Canal Procedure Explained: Step-by-Step Patient Guide


CLINICAL ENDODONTIC EDUCATION

Root Canal Procedure Explained

Demystifying root canal therapy. Learn exactly what happens inside the treatment room, how modern technology ensures a painless experience, and how the procedure saves your natural smile.

📅 Updated: June 2026
⏱️ 12-14 Min Read
✓ Verified by Endodontic Specialists

What is a Root Canal & Why is it Done?

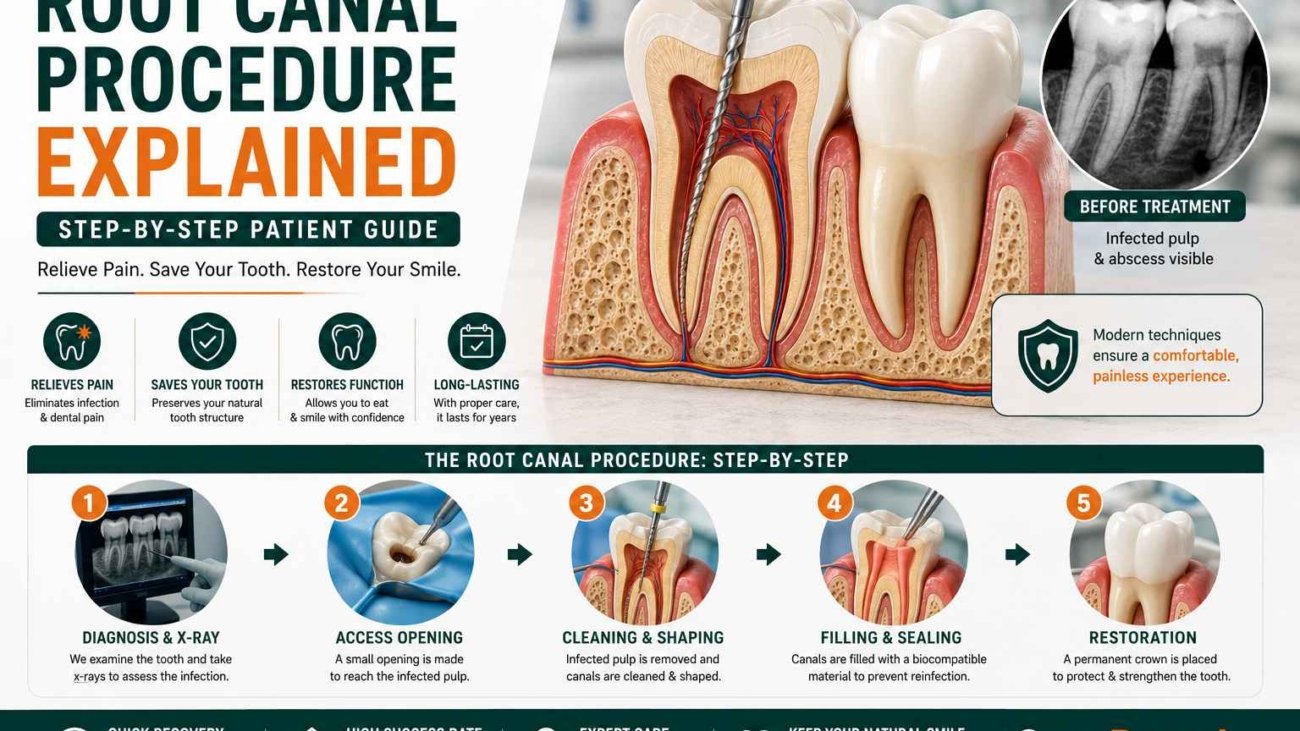
A root canal (known clinically as **endodontic therapy**) is a standard dental procedure used to save a tooth that has become severely decayed, cracked, or infected. Inside the hard outer layers of your tooth (the enamel and dentin) sits a soft tissue reservoir called the **pulp**, which contains sensitive nerves, blood vessels, and connective tissue. When bacteria breach this inner chamber due to a deep cavity or structural injury, the pulp becomes inflamed and infected. If left untreated, this infection can form a painful abscess, destroy the surrounding jawbone, and force an eventual tooth extraction. A root canal procedure removes the damaged pulp, cleans and sanitizes the inner chambers, and seals the space to preserve your natural bite.

1. Signs & Symptoms That a Root Canal is Needed

How do you know if an infection has made its way into the pulp of your tooth? While some cases display zero warning signs, most internal tissue infections present clear clinical symptoms that indicate immediate care is required:

Persistent, Throbbing Pain

A continuous, deep ache that echoes throughout your jaw, face, or neighboring teeth is a primary sign. This pain often increases when lying down or when biting down directly on the affected tooth.

Extreme Thermal Sensitivity

A sharp pain or lingering ache when drinking hot coffee or cold water. If the sensitivity continues for minutes after removing the hot or cold source, the internal nerve tissue is likely damaged.

Gum Swelling & Abscesses

Tender, inflamed, or darkened gums around the localized area. A small pimple-like bump (known as a fistula or abscess) may develop on the gum, occasionally discharging a fluid that leaves a bad taste in your mouth.

2. The Root Canal Procedure: Step-by-Step Breakdown

A root canal procedure is standard, predictable, and typically completed in one or two short visits. Understanding the individual stages can help ease any anxiety you might feel before your appointment:

  • Step 1: Clinical Imaging & Setup: Your dentist takes detailed digital x-rays to map out the shape of the root canals and check for infection in the surrounding jawbone. Next, a numbing gel is applied to the gums, followed by local anesthesia to fully numb the tooth. A small sheet of protective rubber (a dental dam) is placed around the tooth to keep it dry and completely free of saliva during treatment.
  • Step 2: Accessing the Infected Chamber: Using a precision high-speed handpiece, the dentist makes a tiny opening in the top biting surface of a molar, or behind a front tooth. This provides clean access into the damaged pulp chamber.
  • Step 3: Removing the Pulp & Cleaning the Canals: The endodontist uses a sequence of tiny, flexible instruments called endodontic files. These files sweep away the dead pulp tissue and gently shape the internal root paths. The empty spaces are continuously flushed out with antimicrobial solutions (like sodium hypochlorite) to kill any remaining bacteria.
  • Step 4: Sealing & Filling the Tooth: Once the canals are fully sanitized and dried, they are filled with a rubber-like material called gutta-percha, mixed with an adhesive sealer to completely close off the canals. A temporary filling is placed over the access hole to protect the tooth until your permanent crown is ready.
  • Step 5: Final Restoration (The Crown): Because a tooth without a living root becomes more brittle over time, you will return in a week or two to have a permanent custom porcelain crown fitted. This fully restores the tooth’s structural strength, allowing you to chew normally.

3. Pain Management & Anesthesia Realities

Is a Root Canal Painful?

The most common myth about root canals is that they are intensely painful. In reality, modern local anesthetics ensure that the procedure feels no different than getting a standard cavity filling.

The actual procedure does not cause pain—it actively removes the inflamed, throbbing nerve tissues that caused your toothache in the first place, providing immediate relief.

What to Expect Post-Treatment

After the local anesthesia wears off, you may experience mild, dull sensitivity or tenderness in the surrounding gums for 2 to 4 days. This is a normal healing response as the deep bone tissues settle.

This temporary discomfort can be easily managed with standard over-the-counter anti-inflammatory medications like Ibuprofen or Paracetamol.

4. Essential Materials Used in Endodontics

Endodontic therapy relies on specialized materials to ensure the empty canals stay completely sealed and free of bacteria for years to come:

Endodontic Material Clinical Purpose Biological Advantage Provided
Gutta-Percha Points A natural, rubber-like thermoplastic material inserted to fill empty canals. Biocompatible and flexible; easily fills complex root shapes without irritating the body.
Bioceramic Root Sealers A medical cement used to secure gutta-percha points inside the canals. Creates a tight, waterproof seal that actively prevents new bacteria from entering.
Sodium Hypochlorite An antimicrobial liquid used to flush and wash out root systems. Dissolves organic debris and sanitizes tiny side branches that tools cannot reach.
Composite Resin A tooth-colored temporary material used to fill the crown access hole. Protects the inner filling material from food particles until a permanent crown is placed.

🔍 Clinical Insight: Accurate diagnosis is essential before any endodontic procedure. Explore our detailed guide comparing modern digital imaging options like how dental x-ray sensors work to see how dentists check for underlying bone abscesses safely.

5. Post-Treatment Recovery & Aftercare Protocols

Protecting your treated tooth while it waits for a permanent crown ensures a smooth recovery and guards against structural damage:

  • Avoid Hard Chewing: Do not chew hard foods on the treated side of your mouth until your permanent crown is cemented. The temporary filling material is soft and can wear down or crack under heavy pressure.
  • Maintain Routine Hygiene: Continue brushing and flossing all your teeth normally. Be extra gentle around the treated tooth when sliding dental floss out from between the teeth so you don’t catch and pull out the temporary filling.
  • Watch for Abnormal Signs: While mild soreness is expected for a few days, contact your dentist if you notice visible swelling in your face or cheek, or experience a return of severe, throbbing pain.

6. Frequently Asked Questions (FAQ)

How many appointments are required to complete a root canal?

Most standard root canals can be completed in a single visit lasting 45 to 90 minutes. If the tooth has a severe, long-term infection, your dentist may place a localized medication inside the canal and wait a week before sealing it at a second appointment.

Is it better to get a root canal or extract the tooth instead?

Saving your natural tooth is always the preferred choice. Keeping your original tooth preserves your natural biting strength and prevents neighboring teeth from shifting out of alignment. Extractions often require more complex, expensive replacements like dental implants or bridges later on.

Can a tooth that has had a root canal get a cavity in the future?

Yes. While the interior of the tooth is sealed and can no longer feel pain, the outer enamel margins around the base of your new crown can still develop decay if plaque is allowed to build up. Routine brushing and professional cleanings remain essential.

Equip Your Practice with Premium Endodontic Supplies

Performing comfortable, predictable root canal treatments requires precision equipment. From premium rotary files and reliable bioceramic sealers to advanced diagnostic systems, SwatDental offers the high-performance materials your practice needs to deliver exceptional care.

ARTICLE EXECUTIVE SUMMARY

This patient education page clarifies the root canal procedure, explaining how modern techniques remove infected pulp tissue and seal the tooth to preserve your natural smile comfortably.

CLINICAL EDUCATION DISCLAIMER

The information provided here is for educational use and should not replace professional diagnosis. If you are experiencing severe dental pain or swelling, please consult a qualified dentist immediately.

© 2026 SwatDental. All rights reserved. | Professional Endodontic Standards | Supply Platform Assets


Dental implant care guide

Dental Implant Care Guide: Complete Post-Op & Long-Term Maintenance


Dental Implant Care Guide: Complete Post-Op & Long-Term Maintenance


CLINICAL PATIENT EDUCATION

Dental Implant Care Guide

An exhaustive roadmap for protecting your surgical investment, featuring immediate post-op protocols, long-term oral hygiene systems, and preventative complication analysis.

📅 Updated: June 2026
⏱️ 14-16 Min Read
✓ Clinical Board Approved

What Are Dental Implants & Why Care Matters

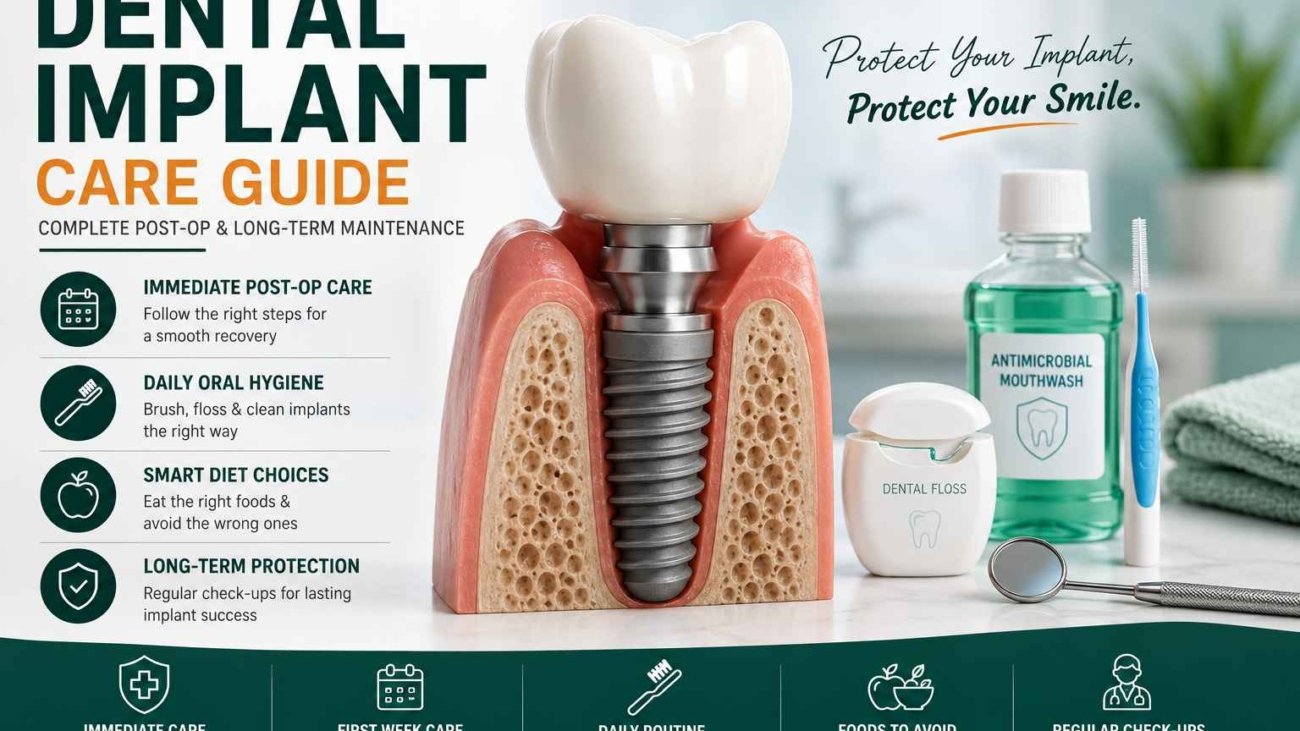
Dental implants are the gold standard for tooth replacement. Unlike superficial bridges or removable dentures, a dental implant utilizes a biocompatible titanium post surgically anchored into your jawbone. Over time, a structural fusion process known as **osseointegration** locks the bone directly to the implant surface, providing a root-like base for a porcelain crown. While dental implants cannot get cavities, their long-term survival relies entirely on the surrounding gum and bone tissue. Without strict care, bacteria can accumulate, leading to peri-implantitis (gum disease around the implant) and eventual bone loss. This comprehensive dental implant care guide outlines exactly how to preserve your smile at every stage of healing and lifestyle wear.

1. Immediate Post-Surgery Care (First 24-48 Hours)

The initial 48 hours following dental implant placement are crucial for stabilization and blood clot formation. Your body is initiating a deep healing response, and minimizing site irritation is key to preventing early complications.

Pain Management

Take prescribed or over-the-counter anti-inflammatory medications (such as Ibuprofen) before the surgical anesthesia wears off completely. Consistent dosing during the first 48 hours regulates systemic swelling and nerve discomfort effectively.

Swelling & Bleeding Control

Apply cold compress ice packs to the side of your face continuously using a 20-minutes-on, 20-minutes-off rotation. Keep steady pressure on the surgical site by biting down gently on damp sterile gauze packs for the first hour post-op.

Rest & Activity Restrictions

Avoid intense aerobic exercise, heavy lifting, or running for at least 48 hours. Elevate your head with an extra pillow when sleeping to lower local blood pressure at the surgical site, preventing throbbing sensations and bleeding.

2. First Week After Implant Surgery

As you enter days 3 through 7, your soft tissues begin adapting to the new implant hardware. While acute pain should start to fade, maintaining clean tissue surfaces without disrupting the surgical stitches remains essential.

  • Oral Hygiene During Healing: Do not brush directly over the surgical wound for the first 4 days to avoid fraying the stitches or opening the incision line. Brush your remaining teeth normally. On day 3, start warm salt water rinses (1/2 teaspoon of salt in a glass of warm water) 4–5 times a day after meals to flush away food debris.
  • What to Eat & What to Avoid: Stick to an ultra-soft or liquid-heavy diet. Nutritious choices include protein shakes, lukewarm pureed soups, Greek yogurt, mashed avocados, scrambled eggs, and smoothies. Avoid crunchy chips, crusty bread, or seeds that can get trapped under gum flaps.
  • Signs of Infection to Watch: Monitor the site daily. It is normal to see mild oozing or swelling peak on day 3, but you should contact your dentist immediately if you experience a foul, pus-like taste, sudden severe throbbing pain that medication cannot control, or a fever above 101°F (38.3°C).

3. Daily Implant Care Routine & Techniques

Once your gums have completely healed and your permanent porcelain crown is attached, your maintenance focus shifts to long-term care. Plaque biofilm can accumulate on implant crowns just like natural teeth, requiring a dedicated daily hygiene routine:

Advanced Brushing Techniques

Brush at least twice a day using a soft-bristled manual toothbrush or an electric sonic toothbrush. Angle the bristles at a 45-degree angle toward the gumline where the crown meets the tissue. Roll the bristles gently into the crevice to sweep out hidden bacteria, cleaning all interior, exterior, and biting surfaces thoroughly.

Flossing Around Implants

Flossing around an implant is slightly different than a regular tooth. Wrap specialized implant floss completely around the neck of the crown, cross the strands in front, and slide it up and down in a gentle shoe-shine motion. This cleans the entire circular base without pushing too hard against the delicate gum seal below.

4. Dietary Parameters & Chemical Restrictions

Your diet directly affects both the initial healing of your implants and the long-term structural integrity of the ceramic crown material. Adjust your habits based on these key guidelines:

  • Hard & Sticky Foods: Do not chew hard ice cubes, unpopped popcorn kernels, hard candies, or tough nuts. These can crack porcelain surfaces and stress the underlying bone structure. Limit sticky caramels or gummy candies, which pull on implant structures and trap sugars in hard-to-reach areas.
  • Hot Foods During Healing: Avoid piping hot coffee, boiling teas, or spicy dishes for the first 5 days post-surgery. High temperatures cause local blood vessels to expand, which can disrupt healing clots and cause the surgical wound to bleed again.
  • Alcohol & Smoking Impact: Avoid alcoholic drinks for at least 72 hours post-op, as alcohol thins the blood and interferes with pain medications. Most importantly, avoid smoking or vaping for at least 6 to 8 weeks. Nicotine restricts capillary blood flow to the gums, significantly slowing down bone integration and increasing the risk of early implant failure.

5. Essential Care Products & Equipment Recommendations

Standard grocery-store oral care items can sometimes be too abrasive for dental implant materials. Using the right specialized tools keeps your restoration clean without scratching its smooth surfaces:

Product Classification Recommended Clinical Attributes Key Health Benefit Provided
Specialized Implant Floss Thick, spongy, woven thread designs with stiff plastic threader tips. Sweeps away food particles around deep margins without tearing.
Non-Abrasive Toothpaste Low RDA (Relative Dentin Abrasivity) value gels; **free of charcoal or baking soda**. Cleans thoroughly without scratching the smooth porcelain glaze or exposed metal parts.
Antimicrobial Mouthwash Alcohol-free formulas containing Zinc, Essential Oils, or Chlorhexidine. Controls harmful bacteria populations without drying out or irritating healing oral tissues.
Interdental Brushes Flexible, plastic-coated wire heads with soft, small nylon bristles. Easily cleans wide gaps underneath dental implant bridges without scratching titanium parts.

🔍 Understanding Your Oral Health: Want to see how dentists check your implant’s bone stability using ultra-low dose direct imaging tech? Explore our full guide explaining how dental x-ray sensors work to learn about high-definition bone visualization.

6. Long-Term Implant Maintenance Systems

Excellent home care is a fantastic start, but maintaining your dental implants long-term requires partnership with your dental professional. Overlooking routine office appointments can allow hidden deep-tissue issues to go unnoticed:

  • Regular Dental Checkups: Schedule professional exams at least every 6 months. Your dentist will evaluate the clinical stability of the implant connection, assess neighboring teeth, and ensure your bite forces are balanced across all structures evenly.
  • Professional Cleanings: Dental hygienists use specialized ultrasonic tips or hand scalers made from carbon fiber or rigid plastic. These tools clean under the gumline without scratching or scraping the titanium implant components.
  • Yearly Monitoring: Your dentist will take yearly low-dose digital x-rays to track bone levels around the implant threads, ensuring the osseointegration bond remains strong and healthy.

7. Common Implant Problems & Solutions

Recognizing early signs of implant irritation allows your dental team to intervene and correct the issue before it leads to serious complications. Watch for these common warning signs:

Loose Implants

If you notice a slight movement or wiggle when chewing, contact your doctor right away. Often, the internal titanium abutment screw holding the crown has simply loosened over time. Your dentist can easily retighten it to the proper torque settings.

Gum Recession Around Crowns

Gums can pull back due to heavy biting forces or overly aggressive brushing. If you notice exposed dark metal margins, your hygienist can adjust your brushing technique or recommend soft-tissue therapy to protect the area.

Bone Loss Warning Signs

Persistent bleeding, deep pocket swelling, or chronic dull pain can indicate early peri-implantitis bone loss. Dentists treat this with deep antibiotic flushes, localized laser therapies, or modern bone grafting techniques.

8. How Long Do Implants Last? Lifespan Analysis

With proper care and maintenance, the titanium base of a dental implant can last **25 years to a lifetime**. The superficial porcelain crown attached to the top handles daily chewing wear and tear, and typically needs replacement or maintenance every 10 to 15 years.

Your implant’s actual lifespan depends on key factors like your overall systemic health (such as controlled blood sugar levels), avoiding grinding habits (bruxism) by wearing an evening nightguard, and consistency with your home hygiene routine. Protecting the surrounding bone ensures your implants remain stable for decades.

9. Frequently Asked Questions

Can I use a standard water flosser tool around my dental implants?

Yes, water flossers are excellent tools for cleaning implants. Use them on a low-to-medium pressure setting and point the tip at a 90-degree angle to flush out food particles from wide spaces under bridges or crowns safely.

Why is smoking considered dangerous after dental implant surgery?

Nicotine narrows the small blood vessels in your gums, reducing the oxygen and nutrients delivered to the healing bone. This significantly slows down the osseointegration process, increasing the chance of early implant failure.

What should I do if my implant crown breaks or cracks?

Avoid chewing on that side of your mouth and schedule an appointment with your dentist. The titanium root post is likely safe beneath the gum; your dentist can easily unscrew the broken crown and replace it with a fresh porcelain restoration.

Find High-Quality Dental Implant Care Supplies

Protecting your dental implants requires the right specialized hygiene tools. From ultra-soft toothbrushes to gentle, plastic-coated interdental brushes and premium oral care kits, SwatDental provides the high-quality supplies your practice or home care routine needs.

ARTICLE EXECUTIVE SUMMARY

This comprehensive care guide outlines the required hygiene protocols, post-surgical timelines, and daily maintenance habits needed to prevent peri-implant disease and ensure dental implants last a lifetime.

CLINICAL INFORMATION DISCLAIMER

This care guide is for educational purposes and should not replace personalized medical advice from your oral surgeon or dentist. Always follow your provider’s specific post-operative instructions.

© 2026 SwatDental. All rights reserved. | International Dental Technology Standards | Practice Platform Assets


Understanding Intraoral Sensors

Understanding Intraoral Sensors: The Complete Guide to Dental Imaging


Understanding Intraoral Sensors: The Complete Guide to Dental Imaging


DIAGNOSTIC TECHNOLOGY INSIGHTS

Understanding Intraoral Sensors

A technical exploration of direct digital radiography, internal scintillator mechanics, chip silicon engineering, and daily calibration protocols.

📅 Updated: June 2026
⏱️ 10-12 Min Read
✓ Verified Engineering Breakdown

⚡ Essential Concept

An **intraoral sensor** is a high-tech electronic receiver placed inside a patient’s mouth to capture digital dental radiographs. Unlike old-fashioned film that requires chemical development, an intraoral sensor converts incoming x-ray energy into light, maps it onto an integrated silicon imaging chip (CMOS or CCD), and transfers high-resolution details directly to your computer screen in under two seconds. Understanding this technology involves knowing how its internal layers manage radiation, why specific chip choices impact detail clarity, and how proper care protects this vital asset.

1. Core Mechanics: How X-Rays Become Images

Modern digital intraoral radiography works through **energy conversion**. The process starts when the dental x-ray tubehead emits targeted photons. These photons pass easily through soft oral tissues but are absorbed by dense enamel, dentin, and bone.

The remaining radiation strikes the intraoral sensor placed inside the mouth. Because silicon imaging chips cannot safely read raw x-rays directly without degrading over time, the sensor uses an internal conversion step. It converts high-energy photons into green or blue visible light, which is then mapped instantly onto a matrix of microscopic pixels.

⚙️ Deep Physics Guide: For an exact, piece-by-piece breakdown of how raw radiation photons interact with electronic plates to form direct digital radiographs, check our companion post explaining how dental x-ray sensors work.

2. Internal Anatomy: Deconstructing Sensor Layers

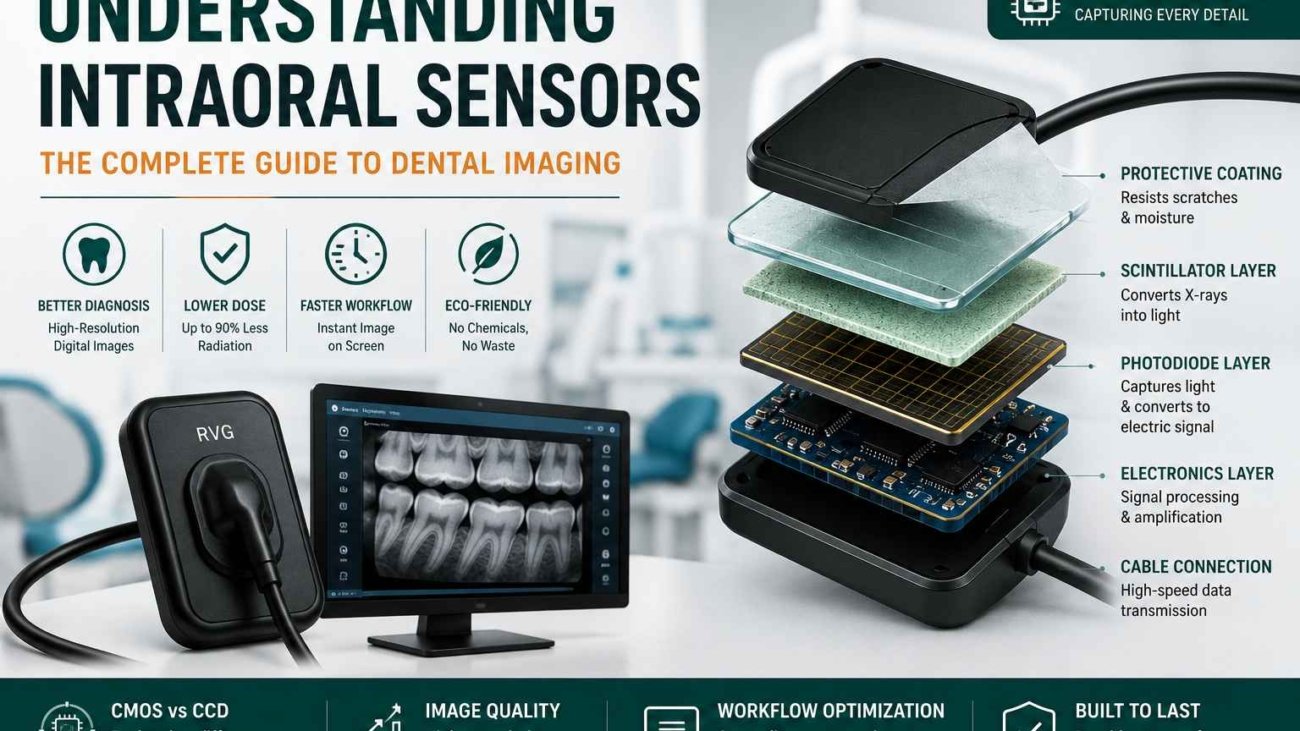
Though a standard intraoral sensor looks like a single piece of sealed plastic, cutting one open reveals several highly engineered layers stacked closely together:

1. Outer Protective Shell

A rugged, hermetically sealed layer made of high-grade polycarbonate or thermoplastic. This casing shields delicate electronics from saliva, impacts, and chemical disinfectants.

2. Scintillator Screen

Usually made from CsI (Cesium Iodide) or Gd2O2S (Gadolinium Oxysulfide). This crystal matrix catches incoming x-rays and instantly converts them into visible light photons.

3. Fiber Optic Plate (FOP)

An optical guide that channels converted light directly down to the silicon wafer while absorbing stray radiation, protecting the primary imaging chip below.

Beneath these primary layers sits the **silicon imaging chip** itself, resting on a shock-absorbing substrate shield that dampens drop impacts. This entire sandwich of components works in harmony to give you an exceptionally clear diagnostic view.

3. Silicon Engineering: CMOS vs CCD Architectures

When exploring intraoral sensors, you will find two primary chip architectures: **CMOS** and **CCD**. While both convert light photons into electrons, they handle that data differently:

Architectural Metric CMOS (Complementary Metal-Oxide) CCD (Charge-Coupled Device)
Data Conversion Location **On-pixel conversion**; processing circuits sit directly on the wafer. **External conversion**; values shift row-by-row to a corner corner node.
Power Consumption Efficiency Ultra-low power demands; avoids heat generation. Significantly higher power needs; runs warm during heavy use.
Clarity & Spatial Resolution Exceptional modern resolution (**20 to 25+ lp/mm**). Solid resolution capabilities (**15 to 18 lp/mm**).
Component Integration High integration; features like USB controllers sit on the same chip. Requires external support chips, increasing final controller size.

While older digital sensors relied heavily on CCD configurations, modern setups overwhelmingly use **CMOS technology**. CMOS chips are more power-efficient, cost-effective to manufacture, and offer superior integration, allowing direct-to-USB features inside a smaller housing.

4. Preventing Sensor Failure: Maintenance Protocols

An intraoral sensor is an investment that requires proper care. Because internal connections are fragile, your clinical team should follow these key maintenance habits:

❌ Critical Hazards to Avoid:

  • Cable Coiling: Never wrap the connection cable tightly around the sensor body. This twists and breaks internal copper lines.
  • Biting Force: Always use proper bite blocks. Never let a patient bite directly on the sensor or its cable.
  • Liquid Immersion: Do not submerge sensors in disinfectant baths unless explicitly approved by the manufacturer.

✅ Recommended Care Habits:

  • Loose Looping: Hang the cable in loose, wide loops on dedicated wall hooks when not in use.
  • Sanitary Sleeves: Always use fresh, customized plastic hygiene sleeves for every exam.
  • Gentle Wiping: Disinfect using damp, non-abrasive hospital-grade wipes approved for active electronics.

5. Frequently Asked Questions

What does line pairs per millimeter (lp/mm) mean for image quality?

Line pairs per millimeter (lp/mm) measures a sensor’s spatial resolution. A higher number means the sensor can clearly show lines placed closer together, helping you spot subtle details like hairline tooth fractures or early interproximal decay.

Why do my digital x-ray images look grainy sometimes?

Grainy images usually stem from under-exposure. If your x-ray machine’s exposure time or millampere (mA) setting is too low, not enough light reaches the pixels, causing visual noise. Adjusting your machine’s settings typically fixes this issue.

What are the standard sensor sizes for typical clinics?

Most brands offer Size 0 (for young children), Size 1 (ideal for narrow adult anterior teeth), and Size 2 (the standard for adult bitewings and periapical views).

Equip Your Practice with Cutting-Edge Sensors

Ready to improve your diagnostic precision? Explore SwatDental’s curated catalog of premium, ergonomic CMOS intraoral sensors, built to handle busy daily workflows.

ARTICLE EXECUTIVE SUMMARY

This educational resource breaks down the internal architecture, pixel arrays, and scintillator mechanics of digital intraoral sensors to help practices maximize image quality and equipment longevity.

DIAGNOSTIC ADVISORY DISCLAIMER

Actual resolution and diagnostic performance depend on software filters, computer display settings, and your x-ray tubehead’s stability. Always follow manufacturer guidelines for calibration.

© 2026 SwatDental. All rights reserved. | International Dental Technology Standards | Practice Platform Assets


RVG Sensor vs PSP Scanner

RVG Sensor vs PSP Scanner: Complete Clinical Comparison Guide


RVG Sensor vs PSP Scanner: Complete Clinical Comparison Guide


DIAGNOSTIC TECHNOLOGY INSIGHTS

RVG Sensor vs PSP Scanner

An in-depth structural comparison analyzing image latency, spatial resolution, wear-and-tear durability, and long-term ROI parameters for modern practices.

📅 Updated: June 2026
⏱️ 12-14 Min Read
✓ Data-Driven Practice Insights

⚡ The Executive Summary

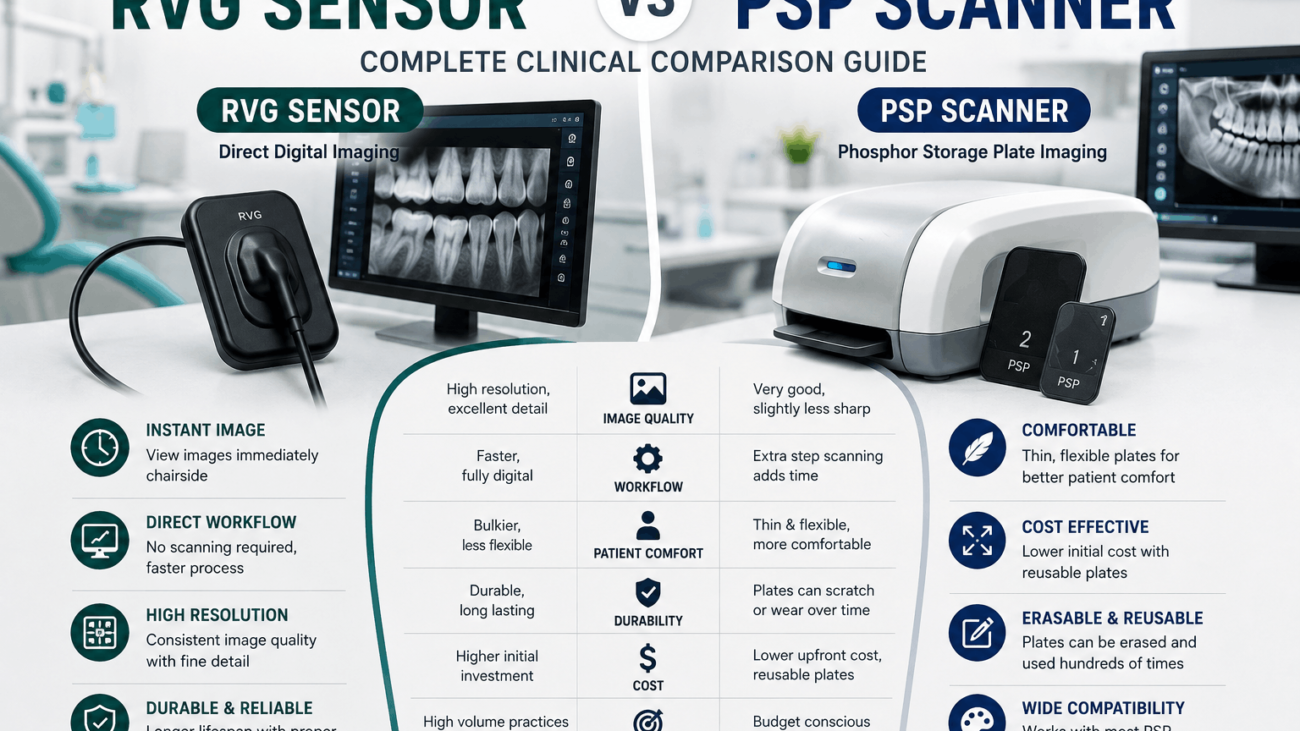
When evaluating an **RVG Sensor vs PSP Scanner**, the choice boils down to a balance between **speed** and **flexibility**. **RVG (Radiovisiography) sensors** use direct digital chips (CMOS) that deliver crystal-clear images to your monitor instantly (under 2 seconds), making them unbeatable for fast-paced procedures like root canals or implant placements. However, they are rigid and thick. **PSP (Phosphor Storage Plate) scanners** use thin, cordless, flexible plates that handle just like traditional film, offering superior patient comfort—especially for children or patients with strong gag reflexes. They require a manual step where plates are fed into a central laser scanner, but a single scanner can support an entire multi-surgery practice.

1. Deep Dive: RVG Direct Digital Technology

**RVG (Radiovisiography)** sensors are the standard choice for direct digital intraoral radiography. These devices house a solid-state sensor chip—typically built on **CMOS (Complementary Metal-Oxide-Semiconductor)** architecture—inside a sealed, liquid-proof plastic shell.

The core advantage of an RVG setup is its **real-time image delivery**. Because the sensor remains hardwired via a durable USB cable directly to the computer, captured images display on your chairside monitor in under two seconds. This completely eliminates wait times, allowing dental teams to view sharp structures instantly.

Furthermore, top-tier RVG sensors deliver incredibly high spatial resolution, frequently exceeding **20 to 25 line pairs per millimeter (lp/mm)**. This level of detail makes them essential for high-precision diagnostic work, such as verifying tiny root canal apex lines or monitoring early bone integration around implant threads.

2. Deep Dive: PSP Indirect Imaging Systems

**PSP (Phosphor Storage Plate)** systems offer an indirect path to digital dental imaging. Instead of a thick, wired silicon block, a PSP setup utilizes thin, flexible plates coated with a layer of photostimulable barium fluorohalide phosphors.

When the x-ray hits the plate, the phosphor crystals trap the radiation energy, creating a latent “hidden” image on its surface. The assistant then takes the cordless plate out of its protective hygiene sleeve and places it into a mechanical laser scanner. The laser reads the trapped energy data, converts it into a digital image file for your screen, and automatically erases the plate with white light so it is ready to be sterilized and used again.

While this scanning loop adds a minor delay (typically 10 to 30 seconds depending on the scanner model), the cordless plates look, flex, and handle just like traditional analog dental film. This design makes them highly versatile and remarkably comfortable for patients.

3. Side-by-Side Architectural Evaluation Matrix

To help you weigh the structural and performance trade-offs of an **RVG Sensor vs PSP Scanner**, this matrix compares their core specifications side by side:

Performance Metric Focus Direct RVG Sensor Technology Indirect PSP Scanner Systems
Image Processing Speed **Instantaneous** (< 2 seconds); direct data link. **Delayed** (10–30 seconds); requires laser scanning.
Physical Comfort & Flexibility Rigid, thick plastic shell; attached to a USB cord. **Thin, flexible, and completely cordless** plates.
Maximum Resolution (lp/mm) Higher peak resolution (**20 to 25+ lp/mm**). Excellent diagnostic resolution (**15 to 20 lp/mm**).
Sizing Variations Available Limited (typically Size 0, Size 1, and Size 2). Comprehensive (**Size 0, 1, 2, 3, and 4 occlusal**).
Long-Term Durability Risks Cable stress breaks or sensor drops can ruin the unit. Plates scratch over time and need periodic replacement.
Multi-Operatory Sharing Requires moving the sensor or buying units for each room. **One central scanner** easily processes plates for multiple rooms.

4. Patient Ergonomics & Clinical Workflow Impact

Choosing between these technologies heavily influences both your daily clinic pacing and your patients’ overall comfort during treatment:

  • The Patient Comfort Factor: Because RVG sensors are thick and unyielding, positioning them in patients with small arches, shallow palates, or large bony exostoses (torus mandibularis) can trigger severe gag reflexes or cause mild tissue bruising. On the other hand, cordless PSP plates bend slightly to match the contour of the jaw, ensuring an easy, pain-free experience for pediatric or sensitive patients.
  • The Real-Time Workflow Advantage: For procedures like endodontic root treatments, checking an intermediate file instantly with an RVG sensor keeps the workspace efficient. The doctor can confirm instrument depths with the file still in place, without breaking concentration. Using a PSP system here requires taking the plate out, walking it over to a scanner, waiting for processing, and returning to the chair—which adds up over a busy day.

🔬 Go Deeper Into Diagnostic Physics: Want to see exactly how these low-dose systems turn minor photon signals into crisp images? Read our comprehensive technical guide explaining how dental x-ray sensors work to learn about internal scintillator screens and direct conversion engineering.

5. Financial ROI & Buyer’s Decision Framework

To optimize your investment, evaluate the equipment through the lens of your practice’s specific setup and long-term financial budget:

When to Invest in RVG Sensors:

Choose an RVG configuration if you operate a fast-paced single-chair setup, handle complex endodontic treatments daily, or want to eliminate manual scanning steps entirely. It requires a higher upfront cost per room, but saves significant staff time over its lifespan.

When to Invest in a PSP Scanner Unit:

Choose a PSP system if you manage a larger multi-operatory clinic where buying separate sensors for every room is budget-prohibitive. A single PSP scanner can effortlessly support up to 4 or 5 operatories via network sharing. It is also the ideal choice for family practices that require true Size 4 occlusal views or need maximum comfort for young children.

6. Frequently Asked Questions

What happens if a PSP plate gets scratched during handling?

Scratches create small visual lines on future images, which can mimic fractures or decay. Luckily, individual PSP plates are highly affordable and easy to replace. This contrasts with RVG sensors, where a severe cable break or dropped chip can require replacing the entire expensive system.

Can I use a combination of both RVG and PSP technologies in the same clinic?

Yes, many modern clinics utilize a hybrid model. They place fast RVG sensors in dedicated surgical or endodontic rooms for real-time tracking, while utilizing a central PSP scanner to process routine preventive bitewings and pediatric exams comfortably.

Which option exposes patients to less diagnostic radiation?

Both systems are exceptionally safe and offer massive radiation reductions (up to 80-90%) compared to old film methods. RVG sensors are slightly more sensitive to incoming x-ray photons, meaning they can operate with minorly shorter pulse times than phosphor plates.

Upgrade to the Perfect Digital Imaging System

Ready to optimize your practice? Whether you want the blistering fast speed of premium digital RVG sensors or the versatile multi-room sharing of an ultra-high-resolution PSP scanner, SwatDental has you covered.

ARTICLE EXECUTIVE SUMMARY

This clinical guide systematically evaluates the architectural differences between RVG sensors and PSP scanners, assisting practice managers in optimizing diagnostic speed, cost management, and patient care workflows.

EQUIPMENT WARRANTY DISCLAIMER

Device specifications, processing response loops, and resolution line pair figures can vary based on manufacturer engineering changes. Always review direct brand equipment specifications prior to final installation.

© 2026 SwatDental. All rights reserved. | International Dental Technology Standards | Practice Platform Assets


Common Dental Imaging Technologies

Common Dental Imaging Technologies: A Complete Clinical Guide


Common Dental Imaging Technologies: A Complete Clinical Guide


CLINICAL EQUIPMENT REVIEW

Common Dental Imaging Technologies

An engineering breakdown of modern diagnostic systems, tracking structural workflows from direct solid-state intraoral receptors up to 3D cone beam volumetric scans.

📅 Published: June 2026
⏱️ 10-12 Min Read
✓ Comprehensive Clinical Hardware Guide

⚡ Summary of Modern Diagnostic Hardware

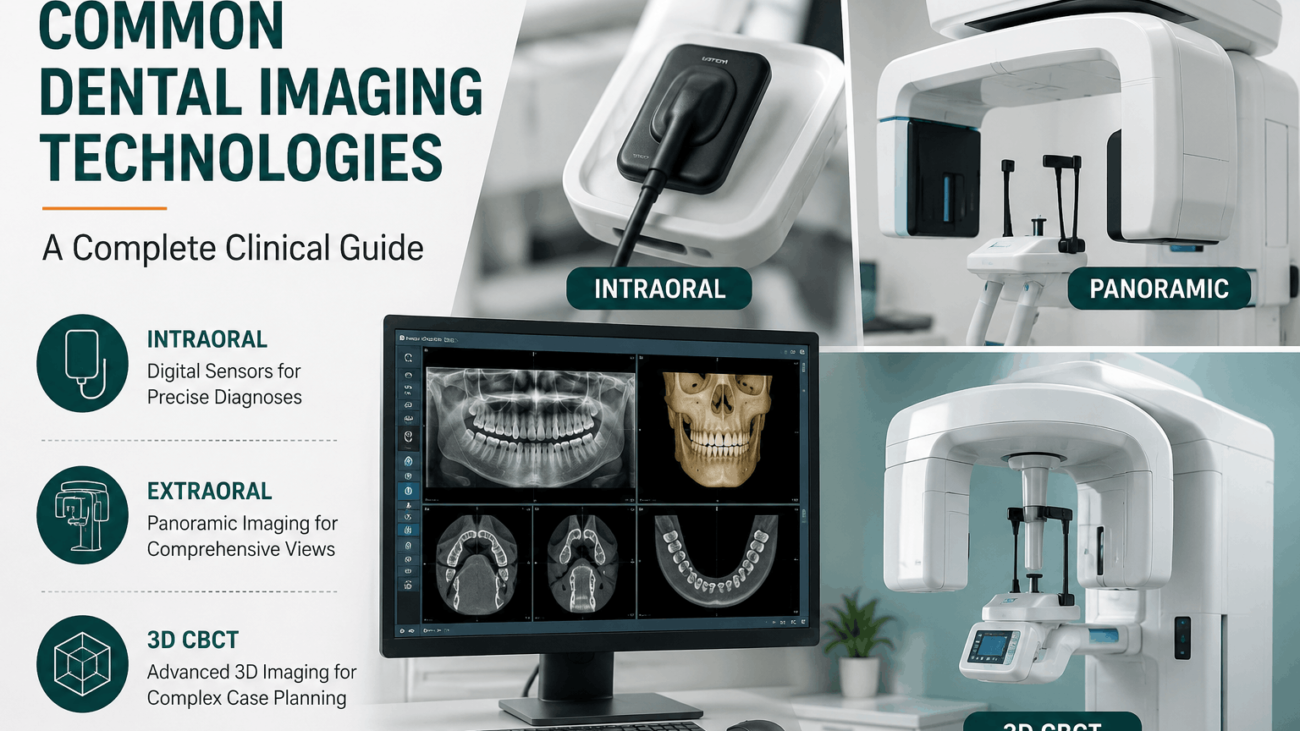
Modern dental practices rely on an integrated suite of **Common Dental Imaging Technologies** to identify pathologies hidden deep within soft tissues and bone matrices. These systems are broadly split into **intraoral technology**—such as high-efficiency, solid-state **CMOS digital sensors** and flexible **Phosphor Storage Plates (PSP)** placed inside the mouth for precise caries detection—and **extraoral technology**. Extraoral solutions feature **Digital Panoramic units** that map out the entire dental arch in a single sweep, alongside **Cone Beam Computed Tomography (CBCT)**, which renders true 3D volumetric images essential for complex root canal therapies, bone grafting procedures, and precision dental implant placements.

1. Intraoral Imaging Receptors (CMOS vs. PSP Plates)

Intraoral modalities represent the most common foundational tier within the landscape of **Common Dental Imaging Technologies**. These systems involve placing a highly responsive receptor directly inside the patient’s oral cavity to capture localized structural views, such as interproximal bitewings, periapical root maps, or wide occlusal structures.

Solid-State Digital Sensors (CMOS)

Direct digital sensors built on **Complementary Metal-Oxide-Semiconductor (CMOS)** architecture stand as the gold standard for clinical speed. These rigid receptors are connected via a durable USB cord or a wireless transmitter block directly to your chairside computer monitor. The instant an exposure finishes, the image renders on-screen in less than two seconds, allowing the dental team to diagnose issues immediately without stepping away from the patient’s side.

Phosphor Storage Plates (PSP)

Phosphor storage systems utilize cordless, highly flexible plates that mirror the comfortable shape of traditional dental film. When an exposure occurs, the phosphor surface stores the raw energy data within its internal lattice. The plate is then placed inside a mechanical laser scanner that processes the digital file onto your screen before instantly clearing the plate for immediate sterilization and re-use.

2. 2D Extraoral Diagnostic Hardware

When a clinician needs a broader view that stretches past individual tooth roots, they shift toward extraoral imaging platforms. These systems keep the imaging receptors completely outside the patient’s mouth, utilizing synchronized mechanical sweeps to capture sweeping anatomical maps.

**Digital Panoramic Radiography** machines are a vital asset within this category. The x-ray source arm revolves smoothly around the patient’s head, generating a single, flattened 2D panoramic map that displays both jaw arches, the temporomandibular joints (TMJ), and the maxillary sinus cavities simultaneously. For specialized orthodontic practices, **Cephalometric attachments** are added to these systems to capture precise lateral skull bone proportions, which are critical for charting shifting orthodontic movements accurately.

3. 3D Cone Beam Computed Tomography (CBCT)

While 2D panoramic sweeps provide fantastic foundational summaries, flat images can occasionally camouflage deep structural overlaps. **Cone Beam Computed Tomography (CBCT)** resolves this limitation by providing true 3D volumetric rendering to modern dental operatories.

Unlike heavy medical CT scanners that rely on thin slice paths, a dental CBCT machine emits a highly focused, cone-shaped radiation beam. As the arm rotates around the patient, it captures hundreds of distinct high-resolution data slices in a single pass. The processing software compiles these data blocks into an interactive 3D model, allowing oral surgeons and endodontists to rotate bone maps, inspect hidden root canal branches, and plan dental implant paths with microscopic accuracy.

4. Next-Gen Auxiliary Imaging Systems

To round out a truly modern diagnostic workflow, clinics frequently add non-radiographic auxiliary technologies to their setups. **Intraoral Cameras** are small, pen-sized devices equipped with bright LED rings that take high-magnification, full-color photos of tooth surfaces. These systems serve as powerful patient education tools, allowing individuals to see structural fractures or margin leaks directly on a chairside screen.

Similarly, advanced **Digital Transillumination** devices pass intense, focused near-infrared light paths straight through tooth structures. Because dense, healthy enamel guides light differently than active decay networks, this technology allows clinicians to spot early interproximal caries without exposing the patient to any diagnostic radiation.

5. Comprehensive Imaging Technology Comparison Matrix

This analytical reference matrix compares the primary systems within modern dental imaging, helping you evaluate performance and clinical scope:

Imaging Modality Technology Image Format Core Diagnostic Target Focus Primary Workflow Advantage
CMOS Digital Sensors High-Bit 2D Digital Map Interproximal decay networks, fine root details, bone levels **Instant chairside rendering** in under 2 seconds; zero processing lag.
Phosphor Storage Plates (PSP) Flexible 2D Digital Scan Caries detection, multi-size pediatric and adult views Cordless, thin plate design provides **excellent patient comfort**.
Digital Panoramic Units Wide 2D Comprehensive Map Full dental arch alignment, TMJ paths, sinus boundaries Captures the entire oral complex in **one single automated sweep**.
3D CBCT Systems 3D Volumetric Model Implant path planning, bone volume, root canal paths Delivers comprehensive **three-dimensional architectural precision**.
Intraoral Cameras Full-Color High-Mag Photo Surface fractures, soft tissue marks, old crown margins **Exceptional patient education tool** for visual verification.

🔬 Go Deeper Into Sensor Engineering: To truly understand the internal silicon structures and scintillator physics that power these high-speed intraoral systems, explore our detailed guide explaining exactly how dental x-ray sensors work to master direct-conversion engineering and pixel architectures.

6. Frequently Asked Questions

What is the practical difference between choosing a CMOS sensor over a PSP system?

CMOS sensors provide direct data processing straight to your screen in under two seconds, optimizing fast-paced operations. PSP systems require a manual scanning step, but they offer greater plate flexibility, which helps when accommodating patients with shallow palates or sensitive anatomy.

Why are 3D CBCT scans preferred over 2D periapical options for dental implant placements?

Standard 2D images cannot show the true physical thickness or width of the jawbone, which introduces risk when plotting implant posts. A 3D CBCT scan provides cross-sectional views that allow doctors to precisely evaluate bone volume and avoid sensitive nerve paths.

Do non-radiographic transillumination devices entirely replace standard x-rays?

No. While transillumination tools excel at spotting early interproximal enamel fractures without radiation, they cannot penetrate deep bone layers or trace underlying root infections, meaning standard digital sensors remain a clinical necessity.

Modernize Your Clinic With Elite Imaging Systems

Equip your practice with state-of-the-art diagnostic power. Discover top-tier digital CMOS sensors, smart PSP laser scanners, and advanced 3D CBCT configurations at SwatDental.

ARTICLE EXECUTIVE SUMMARY

This comparative clinical reference catalogs the most common dental imaging technologies, explaining how contemporary practices balance direct intraoral chip workflows with high-tier volumetric 3D diagnostic platforms.

TECHNICAL REGULATORY DISCLAIMER

The diagnostic equipment specifications and guidelines detailed here are intended strictly for educational and general information reference. They do not replace hands-on manufacturing protocols, device manuals, or expert medical directives.

© 2026 SwatDental. All rights reserved. | International Dental Engineering Standards | Secure CMS Delivery


Are Dental X-Rays Safe

Are Dental X-Rays Safe? Clinical Radiation Facts & Safety


Are Dental X-Rays Safe? Clinical Radiation Facts & Safety


PATIENT EDUCATION & SAFETY

Are Dental X-Rays Safe?

Demystifying diagnostic radiation exposure using concrete scientific benchmarks, millisievert data, and the protective engineering inside modern imaging hardware.

📅 Published: June 2026
⏱️ 8-10 Min Read
✓ Verified by Radiology Standards

⚡ The Definitive Clinical Answer

Yes, **modern dental X-rays are exceptionally safe**. When asking **Are Dental X-Rays Safe?**, it helps to look at the numbers: a standard set of digital intraoral bitewings exposes a patient to roughly **0.005 millisieverts (mSv) of radiation**. This tiny amount is equivalent to what you naturally absorb from the sun and soil during just **less than one single day of normal life on Earth**. Thanks to advanced solid-state **CMOS digital sensors**, lead-lined thyroid collars, and tightly focused radiation beams, the medical risk is incredibly low, while the diagnostic benefit of identifying underlying bone loss, root infections, and deep decay is safely maximized.

1. Putting Radiation into Perspective: The mSv Metric

The word “radiation” often triggers immediate anxiety, but the key to addressing whether **Are Dental X-Rays Safe?** is understanding the concept of dosage scale. In medical physics, effective radiation absorption is calculated using a metric called **Millisieverts (mSv)**.

Human beings are exposed to natural background radiation every second of their lives. Radioactive isotopes in the earth’s rocky layers, cosmic rays hitting our atmosphere from deep space, and even natural potassium traces in food items create a steady baseline exposure. On average, a typical person absorbs roughly **3.0 mSv of background radiation every year** simply by existing on the planet. When contrasted against this continuous background baseline, the electrical emission from a focused dental image is minor.

2. Real-World Radiation Dosing Benchmark Matrix

To truly understand the question—**Are Dental X-Rays Safe?**—it helps to see how dental diagnostics compare to other everyday sources of radiation exposure:

Exposure Event Source Approximate Radiation Dose (mSv) Equivalent Natural Background Time Baseline
Digital Intraoral Bitewings (4 Images) **0.005 mSv** Less than 1 Single Day of normal living
Digital Panoramic Extraoral Scan **0.010 to 0.015 mSv** Roughly 1 to 2 Days of normal living
Cross-Country Airline Flight (NY to LA) **0.035 mSv** About 4 Days of elevated cosmic ray exposure
Annual Natural Background Intake (Global Average) **3.000 mSv** 365 Days of standard environmental background
Standard Medical Chest X-Ray **0.100 mSv** About 10 Days of normal living
Medical Lumbar Spine Series **1.500 mSv** Roughly 6 Months of normal living
Full Medical Abdominal CT Scan **10.000 mSv** Roughly 3 Years of accumulated natural baseline exposure

3. How Digital Technology Redefined Patient Safety

The conversation around safety has completely shifted over the last decade thanks to the decline of traditional analog film packets. Old-school film setups relied on silver halide crystals, which required a longer, heavier burst of radiation to register an image on the plastic sheet.

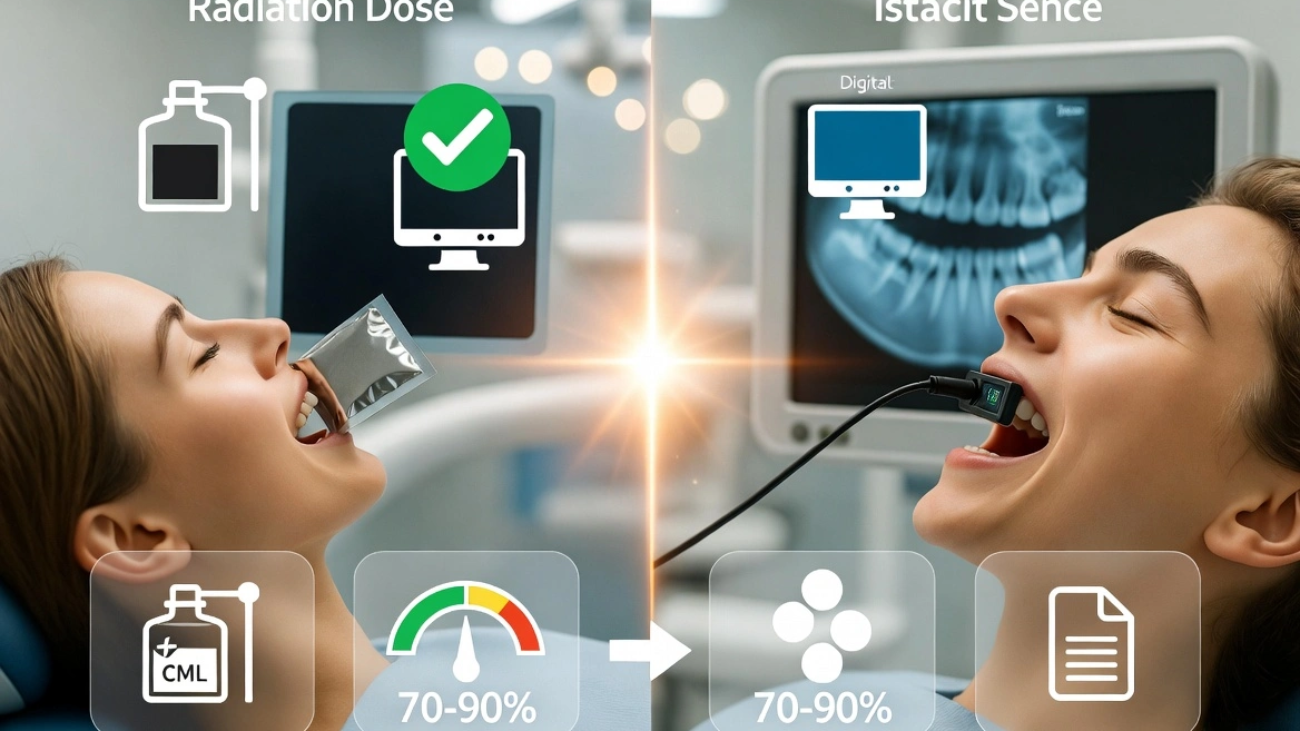
Today’s **modern digital CMOS sensors** use highly advanced active pixel technology. These solid-state silicon chips catch incoming photons and convert them into clear digital images with incredible efficiency. This technological leap allows modern practices to cut down patient radiation exposure by **70% to 90%** compared to old film methods, making an already low-risk procedure practically microscopic.

4. Triple-Layer Protection Protocols

In addition to utilizing fast digital sensors, dental teams use a multi-layered safety strategy to ensure patient exposure stays as close to zero as possible:

The ALARA Principle

Standing for **As Low As Reasonably Achievable**, this is the guiding rule for clinical radiography. It means a doctor will never take an image just because a calendar says so. Every single scan must have an explicit diagnostic reason based on a physical check of your teeth.

Leaded Aprons & Thyroid Collars

Even though modern X-ray beams are incredibly focused, protective aprons lined with lead or composite metals block any secondary scatter radiation. A built-in thyroid collar fits securely around the neck, completely shielding sensitive hormone glands from unnecessary exposure.

Precision Beam Collimation

Modern X-ray tubeheads use long, lead-lined cones called collimators. Instead of letting radiation spread out in a wide circle, a rectangular collimator narrows the beam down to the exact size and shape of the sensor, protecting the surrounding facial tissues perfectly.

5. Diagnosing vs. Guessing: The Hidden Hazard of Refusal

When considering **Are Dental X-Rays Safe?**, it’s crucial to look at the other side of the equation: the very real danger of refusing necessary diagnostic images. A standard visual look with a dental mirror can only see the outer surfaces of your enamel.

More than **50% of an adult’s tooth structure** hidden beneath the gum line remains completely invisible to the naked eye. Without digital imaging, serious issues can develop undetected, including:

  • Hidden decay tunneling between tight tooth contacts.
  • Asymptomatic infections brewing deep around root tips or bone structures.
  • Silent jawbone loss caused by progressive periodontal disease.
  • Cysts, abscesses, or impacted teeth threatening neighboring roots.

By the time these hidden anomalies cause physical pain, the damage is often extensive, requiring complex treatments like root canals or extractions. Catching these issues early with low-dose digital imaging is the safest way to preserve your long-term health.

🔬 Go Deeper Into the Technology: Want to see exactly how these low-dose systems turn minor photon signals into crisp images? Read our comprehensive technical guide explaining how dental x-ray sensors work to learn about internal scintillator screens and direct conversion engineering.

6. Frequently Asked Questions

Are dental X-rays safe for young children?

Yes, they are completely safe. Children’s developing mouth structures actually make them prime candidates for early monitoring. Modern digital systems feature customized pediatric sizing modes that reduce exposure to a tiny fraction of adult settings.

Can dental radiography increase my long-term medical risks?

The risk of developing complications from a modern digital dental scan is practically zero. You absorb far more radiation from everyday cosmic rays during a routine commercial flight than you ever will from a localized bitewing set.

Why does the assistant leave the room if dental X-rays are safe?

While a single X-ray dose is minor for a patient, dental assistants take dozens of scans every single day. Stepping behind a lead-shielded wall protects the clinical team from accumulating repetitive exposure over years of practice.

Upgrade to Ultra-Low Radiation Standards

Give your patients absolute peace of mind. Equip your practice with the industry’s safest high-efficiency digital CMOS sensors and portable, heavily shielded X-ray tech from SwatDental.

ARTICLE EXECUTIVE SUMMARY

This patient safety review breaks down the clinical reality of modern dental X-ray safety, demonstrating how contemporary digital sensor engineering reduces dose absorption levels to standard background minimums.

CLINICAL RADIATION DISCLAIMER

The dosage data and safety metrics presented here are for patient education and general informational reference only. They do not replace professional medical advice, direct clinic radiation audits, or individual doctor diagnoses.

© 2026 SwatDental. All rights reserved. | Global Radiographic Safety Standards | Practice Platform Terms


How Often Should Dental X-Rays Be Taken

How Often Should Dental X-Rays Be Taken? Clinical Guidelines Guide


How Often Should Dental X-Rays Be Taken? Clinical Guidelines Guide


CLINICAL RADIOLOGY POLICIES

How Often Should Dental X-Rays Be Taken?

A technical review outlining official diagnostic intervals, risk-based classification pathways, and how modern digital sensor systems alter clinical exposure schedules.

📅 Updated: June 2026
⏱️ 9-11 Min Read
✓ ADA & FDA Framework Compliant

⚡ Quick Diagnostic Interval Guide

When evaluating **How Often Should Dental X-Rays Be Taken?**, there is no generic, one-size-fits-all calendar baseline. According to official American Dental Association (ADA) and FDA guidelines, radiographic frequency must be personalized based on a patient’s **age, clinical history, and active risk for oral disease**. For healthy adult patients with zero active caries history and low risk levels, bitewing examinations are typically recommended every **24 to 36 months**. However, for patients classified as high-risk—such as individuals suffering from active decay, structural bone loss, dry mouth syndromes, or hidden secondary enamel lesions—intervals are compressed to every **6 to 18 months** to catch underlying pathology before extensive damage occurs.

1. The Core Rule: Custom Risk Assessment vs. Calendar Defaults

In the past, patients often assumed that sitting down for dental images was a mandatory, automated addition to every single six-month cleaning appointment. However, modern evidence-based dentistry shifts the focus entirely. When establishing **How Often Should Dental X-Rays Be Taken?**, clinical regulatory bodies state that every single exposure must be explicitly justified by an updated physical evaluation.

Doctors analyze a patient’s historical oral patterns, structural anatomy stability, systemic medical health histories, and lifestyle habits before choosing an exposure plan. This means a patient with a pristine track record of zero structural enamel wear will experience vastly different exposure paths compared to someone managing shifting localized parameters.

2. Frequency Recommendations by Age Groups

Age groups alter the internal calcification structures of teeth and the overall movement speeds of hidden oral conditions, directly impacting how often a clinician needs to review diagnostic images.

Pediatric & Adolescent Stages

Children feature dynamic primary and mixed tooth setups. Because their jaw structures are actively growing and thin primary enamel layer walls can allow decay to progress quickly into nerve chambers, high-risk pediatric cases require bitewing sweeps every **6 to 12 months**. For low-risk children, the interval expands to **12 to 24 months**.

Fully Developed Adults

Once dental arches mature fully, structurally stable adults with sound enamel walls can easily extend their intervals safely. Low-risk individuals require routine bitewing checks only every **24 to 36 months**. For adults facing active recurring decay or shifting underlying restorations, clinical safety parameters direct imaging cycles every **6 to 18 months**.

New Patient Initial baselines

When an unfamiliar patient registers at a practice without access to recent historical records, a baseline scan is required to map out root paths, evaluate hidden dense structures, and identify bone levels. This typically involves a comprehensive **Full-Mouth Series (FMX)** or a panoramic sweep accompanied by localized bitewing views.

3. Clinical Indicators That Compress X-Ray Timelines

Several clinical and systemic conditions immediately push a patient into the high-risk category, requiring shorter intervals when determining **How Often Should Dental X-Rays Be Taken?**:

Active Periodontal Pathology

When a patient shows signs of receding gum structures or deep periodontal pocketing depths, regular physical checks are insufficient. The clinical team must routinely track structural crestal bone level heights beneath the tissue line to halt advanced bone loss.

Extensive Restorative History

Clinics managing complex smile reconstructions, deep crowns, multi-surface fillings, or implant fixtures must monitor margins closely. Hidden secondary decay forming right beneath old filling margins is impossible to view with eyes alone.

Xerostomia (Dry Mouth Syndromes)

Saliva serves as the mouth’s natural defense mechanism, neutralizing acids and continuously washing away sugars. When medications or medical issues dry out these fluid paths, decay can accelerate rapidly, necessitating tighter imaging cycles.

Active Orthodontic Mechanics

Applying structural force layers to move teeth requires careful tracking. Clinicians utilize focused imaging sweeps to watch changing root alignment profiles, evaluate underlying bone density states, and protect root tips from resorption risks.

4. How Modern Digital Sensors Impact Frequency Selection

One of the biggest factors that makes regular imaging safer today is the widespread shift away from legacy analog film packets. The core issue with old-school setups wasn’t just the operational lag; it was the high radiation dosing required to activate the film grain layers.

Modern dental clinics use highly responsive solid-state sensors. These digital tools feature highly advanced silicon design matrices that catch and convert photons with incredible efficiency, allowing doctors to capture high-definition anatomical details while using **up to 90% less radiation** compared to vintage film paths.

Because direct digital imaging cuts patient exposure down to microscopic millisievert ranges, it drastically lowers the safety hurdle for necessary diagnostic tracking. If a clinic needs to map a complex recovery path or check structural stability across shorter cycles, they can do so safely without pushing patients past acceptable background radiation safety limits.

5. ADA & FDA Radiographic Selection Master Matrix

This formal guideline matrix maps out standard, evidence-based recommendations for **How Often Should Dental X-Rays Be Taken?** across common patient risk profiles:

Patient Category & Age Group Clinical Status Profile Recommended X-Ray Modality Optimal Clinical Dosing Interval
Child (Primary/Mixed Dentition) Active decay history or high risk indicators Posterior Bitewings Every 6 to 12 Months
Child (Primary/Mixed Dentition) Zero active decay history; low risk indicators Posterior Bitewings Every 12 to 24 Months
Adolescent (Transitioning Dentition) Active decay history or high risk indicators Posterior Bitewings Every 6 to 18 Months
Adolescent (Transitioning Dentition) Zero active decay history; low risk indicators Posterior Bitewings Every 18 to 36 Months
Adult (Fully Developed Dentition) Active decay history or high risk indicators Posterior Bitewings Every 6 to 18 Months
Adult (Fully Developed Dentition) Zero active decay history; low risk indicators Posterior Bitewings Every 24 to 36 Months
New Patient (All Age Categories) Baseline intake; historical data missing FMX (Full Mouth Series) or Panoramic + Bitewings Administered immediately during initial comprehensive exam

🔬 Deepen Your Technical Foundation: To understand the exact semiconductor physics that make these low-radiation intervals safe, explore our comprehensive breakdown detailing exactly how dental x-ray sensors work to learn about cesium iodide scintillators and high-bit pixel mapping.

6. Frequently Asked Questions

Should pregnant patients completely avoid routine dental X-rays?

No, elective routine checks can be deferred until after delivery, but necessary diagnostic images to treat active tooth infections or emergencies are completely safe during pregnancy. Modern digital sensors combined with proper leaded aprons and thyroid shields keep scatter radiation away from the abdomen entirely.

How often should a full-mouth panoramic or CBCT image be updated?

Panoramic images are typically updated every 3 to 5 years depending on wisdom teeth development or TMJ monitoring needs. 3D CBCT scans are never scheduled on an automated calendar; they are ordered only when complex surgical or implant needs arise.

What are the risks if I choose to decline all recommended dental X-rays?

Declining images leaves hidden interproximal decay, jawbone loss, deep cysts, and root infections completely invisible. By the time these issues cause physical pain, the structural damage is often severe, requiring root canals or extractions that could have been avoided.

Equip Your Clinic for High-Efficiency Diagnostics

Ensure your practice delivers ultra-low dose diagnostic safety. Discover the industry’s finest digital CMOS sensors, phosphor storage plate systems, and nimble handheld generators at SwatDental.

ARTICLE EXECUTIVE SUMMARY

This clinical guide breaks down the risk-based factors governing how often should dental x-rays be taken, highlighting why automated calendar intervals are being replaced by custom diagnostic plans designed around safety and patient history.

CLINICAL RADIATION DISCLAIMER

The diagnostic timelines and criteria compiled here are intended strictly for educational and general information reference. They do not substitute for custom patient assessments, direct dental diagnoses, or clinical device guidelines.

© 2026 SwatDental. All rights reserved. | Regional Healthcare Radiographic Guidelines | Practice Portal Security


Digital vs Traditional Dental X-Rays

Digital vs Traditional Dental X-Rays: The Complete Clinical Comparison


Digital vs Traditional Dental X-Rays: The Complete Clinical Comparison


CLINICAL RADIOLOGY REVIEW

Digital vs Traditional Dental X-Rays

A deep technical evaluation comparing solid-state digital sensors against legacy analog film envelopes across diagnostic resolution, patient dosing safety, and operatory costs.

📅 Published: June 2026
⏱️ 10-12 Min Read
✓ Technical Safety Compliant

⚡ Core Technology Paradigm Shift

The central difference when breaking down **Digital vs Traditional Dental X-Rays** lies in the **capture mechanism and processing time**. Traditional X-rays rely on slow, analog film packets that require chemical development in a darkroom using toxic fixing agents, imposing a 5-to-8 minute operational delay. Conversely, digital radiography leverages sensitive solid-state silicon sensors (**CMOS/CCD**) or reusable phosphor sheets (**PSP**) that immediately translate radiation into high-bit pixel maps on a monitor. This shift to digital reduces patient **radiation exposure by up to 70% to 90%**, eliminates hazardous chemical waste, and unlocks advanced software manipulation filters for vastly sharper diagnostic precision.

1. Radiation Dosing & Patient Safety Metrics

When patients evaluate the topic of **Digital vs Traditional Dental X-Rays**, radiation exposure is almost always their primary concern. Traditional film radiography uses silver halide grains suspended inside a plastic sheet. Because these physical film grains require a relatively massive volume of photon strikes to trigger a dark chemical reaction, the patient must be exposed to longer radiation bursts from the tubehead.

Modern digital sensors alter this safety dynamic entirely. High-tier solid-state **CMOS receptors** boast exceptionally high **Quantum Efficiency (QE)**. Because the silicon pixels are highly responsive to photon packets, they require significantly less radiation to output a perfectly saturated image. Transitioning to digital channels slashes patient exposure settings by **70% to 90%** depending on whether you are shifting from D-speed or faster F-speed film, aligning perfectly with the strict **ALARA (As Low As Reasonably Achievable)** clinical safety protocols.

2. Darkroom Chemicals vs. Immediate Screen Rendering

The day-to-day operatory workflow represents another massive point of divergence when comparing **Digital vs Traditional Dental X-Rays**. The difference in image rendering mechanics directly dictates how many patients your team can smoothly care for in a shift.

Traditional Film Processing Cycles

Taking an analog film X-ray requires a tedious sequence of manual mechanical steps:

  • Place the plastic film envelope in the patient’s mouth.
  • Expose the packet, then walk it down the hall to a light-locked darkroom or counter-top processor box.
  • Unwrap the packet carefully, feed the film sheet into developer fluid tanks, rinse it in water, slide it into fixing chemicals, and wait for a full drying cycle.

This entire process introduces a **5-to-8 minute delay**. If the assistant accidentally misaligned the tubehead angle slightly, the error isn’t discovered until the dried film is ready, forcing a frustrating re-shoot sequence that breaks your schedule flow.

Digital Immediate Acquisition Channels

Direct digital sensors compress this entire workflow into a matter of moments. The solid-state chip rests securely inside a hygienic protective sleeve and captures the image data instantly. Within **less than two seconds**, the completed scan flashes onto the treatment monitor right next to the patient’s chair.

The clinician remains comfortably at the bedside the entire time. If an exposure adjustment or angle modification is needed, it can be executed instantly, creating a vastly smoother experience for both the assistant and the patient.

3. Spatial Resolution & Software Image Enhancement

At first glance under perfect laboratory setups, traditional high-quality analog film can display strong spatial resolution marks. However, in the real-world daily practice of analyzing **Digital vs Traditional Dental X-Rays**, digital channels possess a decisive diagnostic advantage thanks to software manipulation.

When a traditional film is processed, the resulting image is static. If the exposure turns out slightly too dark or too light, you must rely on a standard desk lightbox and a magnifying glass to squint at the small 2-inch plastic sheet, searching for subtle anomalies.

Digital imaging software transforms this passive review into an active diagnostic tool. Once the digital pixel map lands on your monitor, you can immediately **zoom in, adjust contrast levels, and invert grayscale ranges**. Specialized filters can sharpen edge boundaries to spotlight initial interproximal decay networks, trace tricky bone loss lines, or inspect apical root paths with incredible precision.

4. Environmental Impact & Practice Economics

Looking past direct clinical variables reveals a stark contrast in the environmental footprints and backend business costs of **Digital vs Traditional Dental X-Rays**. Traditional systems generate a continuous stream of material waste and chemical overhead. Practices must constantly purchase film packets, lead backing sheets, and fresh gallons of developer and fixer fluids.

Disposing of these depleted chemicals is heavily regulated because they carry hazardous heavy metal ions. This requires specialized waste collection contracts that add ongoing financial overhead to your office ledger.

While switching to a digital workflow involves an initial hardware investment in solid-state sensors, it eliminates these recurring material costs entirely. Your practice completely wipes away darkroom chemical maintenance, plastic film packet garbage, and physical chart filing cabinets. Digital scans are saved straight to local servers or secure cloud platforms, making records instantly shareable with insurance companies or specialists via encrypted links.

5. Side-by-Side Performance Comparison Matrix

This comprehensive table summarizes the core differences between **Digital vs Traditional Dental X-Rays** to help guide your practice conversion plans:

Performance Metric Traditional Analog Film Systems Modern Digital Sensor Platforms
Patient Radiation Exposure **Higher:** Requires extended emission timing to activate film grain matrices. **Significantly Lower:** Slashed by **70% to 90%** due to high QE silicon logic.
Image Acquisition Speed **Delayed:** Requires **5 to 8 minutes** for complete chemical tank cycling. **Instantaneous:** Renders on operatory screens in **under 2 seconds**.
Diagnostic Viewing Options **Static:** Limited to viewing small physical sheets over a desk lightbox. **Dynamic:** Full-screen zoom, live contrast tweaks, and sharp edge filters.
Chemical & Waste Footprint **High:** Constant disposal of heavy lead sheets and toxic chemical fluid tanks. **Zero:** Entirely paperless and chemical-free electronic data path files.
Record Storage & Sharing **Physical:** Stored in manual chart jackets; requires physical mail for transfers. **Digital:** Instantly integrated into dental software; simple encrypted link sending.
Recurring Material Overhead **High:** Ongoing costs for film packets, developer fluids, and toxic waste disposal. **Minimal:** Bound entirely to initial sensor asset purchases and barrier sleeves.

🔗 Explore the Semiconductor Architecture: If you want to understand the exact internal layer stack configurations that enable this massive radiation reduction, read our detailed technical entry explaining how dental x-ray sensors work to master scintillator physics and chip layouts.

6. Frequently Asked Questions

Can I use my existing wall-mounted tubehead machine if I switch to digital sensors?

Yes, almost all traditional X-ray tubeheads work perfectly with digital sensors. You simply need to adjust the timer setting down to match the shorter exposure intervals required by digital silicon chips.

Is a digital dental sensor uncomfortable for patients compared to soft film?

Rigid solid-state digital sensors are thicker than traditional film packets. However, modern sensor brands counter this by designing smooth, heavily rounded corners and offering multiple sizes to match different patient anatomies cleanly.

How are digital dental X-ray files protected under modern data privacy rules?

Digital radiography files are stored directly inside your practice management software, which secures patient data through advanced local database encryption, user password paths, and encrypted cloud backup networks.

Ready to Transition to Modern Digital Diagnostics?

Stop spending money on recurring film packets and toxic chemical lines. Explore premium, high-efficiency digital imaging configurations at SwatDental to modernize your clinical workflow today.

ARTICLE EXECUTIVE SUMMARY

This comparative clinical reference evaluates the core differences between digital vs traditional dental x-rays, mapping out the clear advantages digital paths offer across patient dosing safety, processing efficiency, and eco-friendly operations.

CLINICAL DISCLAIMER

The technical data compiled here is intended purely for informational, reference, and educational purposes. This reference manual does not substitute for formal equipment calibration plans, expert medical diagnostics, or specialized health directives.

© 2026 SwatDental. All rights reserved. | International Clinical Radiology Standards | Corporate Site Policies


Types of Dental X-Ray Sensors Explained

Types of Dental X-Ray Sensors Explained: The Complete Clinical Guide


Types of Dental X-Ray Sensors Explained: The Complete Clinical Guide


CLINICAL RADIOGRAPHY REFERENCE

Types of Dental X-Ray Sensors Explained

An exhaustive structural analysis breaking down intraoral receptors, traditional radiation delivery machines, handheld portability variants, and advanced diagnostic 3D imaging infrastructure.

📅 Published: June 2026
⏱️ 12-15 Min Read
✓ Peer-Reviewed Engineering Data

⚡ Summary of Imaging Modalities

When evaluating the comprehensive landscape of **Types of Dental X-Ray Sensors Explained**, modern diagnostic systems are fundamentally split between **intraoral digital receptors** and **radiation delivery source units**. Intraoral imaging relies on rigid solid-state detectors (**CMOS/CCD**) for instant on-screen rendering or flexible **Phosphor Storage Plates (PSP)** for enhanced structural adaptation. These receptors collect radiation emitted from structural hardware arrays, which range from traditional **wall-mounted units** and **mobile floor-stand systems** to highly responsive **handheld cordless generators** and advanced **3D Extraoral CBCT infrastructure**. Choosing the correct modality directly determines diagnostic resolution, operatory mobility pathways, and overall clinical setup throughput.

1. Digital Intraoral Receptors: CMOS, CCD, and PSP

To truly unpack the subject of **Types of Dental X-Ray Sensors Explained**, we must first categorize the digital targets placed directly inside the patient’s oral cavity. These sensors act as the structural receptors that record localized radiation differences as high-energy beams pass through dense bone, enamel, and soft tissue structures.

CMOS (Complementary Metal-Oxide Semiconductor)

The contemporary gold standard for solid-state imaging arrays. **CMOS sensors** integrate active pixel logic, meaning every individual pixel well houses its own micro-transistor configuration to amplify and process incoming data streams on site. This allows for near-instant picture display on operator monitors in under two seconds.

CCD (Charge-Coupled Device)

The foundational heritage platform for early digital radiography systems. **CCD sensors** rely on a sequential transfer mechanism where electrical charges are systematically shifted down rows to a single corner readout node for processing. While delivering excellent uniformity, they are vulnerable to image blooming and higher operational latency.

PSP (Phosphor Storage Plates)

A highly flexible, wireless alternative that mimics traditional film mechanics. **PSP plates** use a photostimulable phosphor coating that records a temporary latent image. The plate is then transferred into an external laser scanner unit that reads and clears the data, trading away instantaneous speed to achieve unmatched patient positioning comfort.

2. Radiation Delivery Structural Mechanics: Wall-Mounted vs. Floor-Stand Mobile Systems

A receptor cannot generate diagnostic value without an optimized source engine. A central theme when examining the diverse **Types of Dental X-Ray Sensors Explained** involves assessing the mechanical delivery systems that support the high-voltage x-ray tubehead inside the operatory.

Traditional Wall-Mounted Tubehead Arrays

The classic structural foundation of modern dental practices. These systems feature an articulating arm anchored securely to wall structural studs. The primary benefit of a **wall-mounted x-ray unit** is its complete lack of a floor footprint, keeping operatory walking lanes clear and providing highly predictable drifting resistance during fine alignment adjustments.

However, these configurations restrict radiation capability to a single chair setup. If a practice layout requires multi-room expansion, significant structural costs are required to mount dedicated units inside every separate operational cove.

Mobile Floor-Stand Systems

Designed specifically for clinics that prioritize multi-chair layout adaptability. A **floor-stand x-ray configuration** features a weighted, heavy-duty wheeled caster base supporting the upright counter-balanced extension arm assembly. This setup allows operatory teams to roll a single high-voltage tubehead engine across different rooms smoothly.

The trade-off involves physical space management. The heavy caster base requires active room storage space and requires clinicians to meticulously handle heavy mechanical paths around baseplates, patient chairs, and floor cords.

3. Handheld Cordless Battery Units

One of the most radical developments within the spectrum of **Types of Dental X-Ray Sensors Explained** is the transition toward absolute cordless portability. Modern **handheld x-ray generators** pack high-capacity lithium-ion battery blocks and dense internal lead shielding directly into a camera-style form factor.

This setup allows the clinician to remain continuously at the patient’s bedside, holding the radiation unit completely free of physical mount bounds. By avoiding the need to step entirely outside the room to fire the exposure switch, patient movement artifacts are significantly reduced—an exceptional benefit when managing pediatric or highly anxious patients.

Radiation Safety Engineering Note: Handheld units protect the operator through a dual-layer strategy: heavy internal insulation to absorb secondary leakage, paired with an external clear lead-filled backscatter shield. This shield generates a precise cone of safety, reflecting deflected photon scatter pathways entirely away from the operator’s hands and torso.

4. Advanced Extraoral 3D Infrastructure: CBCT & Panoramic Systems

As diagnostic requirements grow more complex, intraoral views are combined with extraoral systems that capture comprehensive anatomical structures from outside the patient’s face. These systems represent the absolute peak of modern diagnostic hardware capabilities.

2D Panoramic Tomography Arrays

Provides a continuous, flattened broad view mapping the entire maxillo-mandibular arch, temporomandibular joints (TMJ), and maxillary sinus structures onto a single wide visual field. This is achieved by systematically rotating a linked tubehead and extraoral sensor band around the patient’s head in a synchronized path profile.

3D Cone Beam Computed Tomography (CBCT)

Replaces flat 2D approximations with ultra-precise **3D volumetric datasets**. By casting a cone-shaped radiation beam that acquires hundreds of separate thin-slice profiles in a single sweep, software engines reconstruct complete 3D models. This spatial clarity is mandatory for managing precise implant planning, complex endodontic root configurations, and orthodontic path assessments.

5. Cross-Platform Architectural Matrix

To simplify the procurement and deployment process, this master table synthesizes operational capabilities across all major **Types of Dental X-Ray Sensors Explained**:

Imaging System Type Primary Receptor Format Data Output Velocity Core Advantage Primary Operational Limit
CMOS Solid-State Rigid Silicon Active-Pixel Well Matrix Instantaneous (1.5 to 2 Seconds) Hyper-fast workflow and excellent theoretical resolution marks Thick, unyielding casing profile can cause placement discomfort
PSP (Phosphor Plate) Flexible Photostimulable Crystal Sheet Delayed (Requires external laser scan cycle) Thin profile matches traditional film shapes and comfort rules Plates collect physical scratches and require manual handling
Wall-Mounted Unit External Source (Feeds Intraoral Receptors) Determined by attached sensor format Zero floor footprint with highly stable drifting resistance Locked permanently to a single designated operator chair space
Mobile Floor-Stand External Source (Feeds Intraoral Receptors) Determined by attached sensor format Enables single tubehead engine sharing across multiple coves Bulky baseplate footprint requires active room navigation care
Handheld Cordless External Battery Source Array Determined by attached sensor format Allows clinician to hold position smoothly at the patient’s side Requires strict compliance with backscatter shield geometry
3D CBCT Infrastructure Extraoral Rotating Sensor Panel Base Processing delay for full 3D rendering Provides complete 3D volumetric views of anatomical structures Requires substantial capital layout and specialized facility footprint

💡 Deepen Your Technical Foundation: Now that you have explored the wide variety of delivery systems and imaging configurations, you can easily examine the deep atomic conversions that convert radiation into clear pixels. Review our companion guide detailing exactly how dental x-ray sensors work to master the underlying physics behind solid-state conversion layers.

6. Frequently Asked Questions

Is a completely wireless intraoral CMOS sensor path options stable?

Yes, modern wireless CMOS systems use secure radio frequency (RF) or direct Wi-Fi local links to move data packets fast. They are completely stable but rely on on-board battery modules, which slightly increases the thickness of the sensor’s perimeter casing.

Why do panoramic and CBCT machines require patients to stand completely still?

Because extraoral systems use an extended data acquisition arc path that takes several seconds to spin around the face, any minor movement can cause ghosting lines or blur artifacts that ruin the entire scan.

Do handheld radiography options pose high health safety risks for operatory teams?

No, as long as the operator holds the device perpendicular to the patient, keeping themselves securely inside the protection path mapped by the external clear lead-filled shield circle.

Optimize Your Practice Radiography Workflow

Whether you need to deploy thin, patient-friendly phosphor plate workflows, robust solid-state CMOS arrays, or nimble handheld emission tech, our specialists can help configure the ideal diagnostic layout.

ARTICLE EXECUTIVE SUMMARY

This clinical radiography reference manual outlines the technical distinctions governing various types of dental x-ray sensors, supporting mount mechanics, and extraoral imaging frameworks. Understanding these details helps practices elevate diagnostic accuracy while protecting patient comfort and safety protocols.

MEDICAL RESPONSIBILITY DISCLAIMER

The technical descriptions compiled here are intended strictly for educational, reference, and informational use. This material does not substitute for formal technical equipment diagnostics, expert regulatory guidance, or medical operatory protocols.

© 2026 SwatDental. All rights reserved. | Regional Radiography Device Standards | System Privacy Policies