Root canal procedure explained

Root Canal Procedure Explained: Step-by-Step Patient Guide


Root Canal Procedure Explained: Step-by-Step Patient Guide


CLINICAL ENDODONTIC EDUCATION

Root Canal Procedure Explained

Demystifying root canal therapy. Learn exactly what happens inside the treatment room, how modern technology ensures a painless experience, and how the procedure saves your natural smile.

📅 Updated: June 2026
⏱️ 12-14 Min Read
✓ Verified by Endodontic Specialists

What is a Root Canal & Why is it Done?

A root canal (known clinically as **endodontic therapy**) is a standard dental procedure used to save a tooth that has become severely decayed, cracked, or infected. Inside the hard outer layers of your tooth (the enamel and dentin) sits a soft tissue reservoir called the **pulp**, which contains sensitive nerves, blood vessels, and connective tissue. When bacteria breach this inner chamber due to a deep cavity or structural injury, the pulp becomes inflamed and infected. If left untreated, this infection can form a painful abscess, destroy the surrounding jawbone, and force an eventual tooth extraction. A root canal procedure removes the damaged pulp, cleans and sanitizes the inner chambers, and seals the space to preserve your natural bite.

1. Signs & Symptoms That a Root Canal is Needed

How do you know if an infection has made its way into the pulp of your tooth? While some cases display zero warning signs, most internal tissue infections present clear clinical symptoms that indicate immediate care is required:

Persistent, Throbbing Pain

A continuous, deep ache that echoes throughout your jaw, face, or neighboring teeth is a primary sign. This pain often increases when lying down or when biting down directly on the affected tooth.

Extreme Thermal Sensitivity

A sharp pain or lingering ache when drinking hot coffee or cold water. If the sensitivity continues for minutes after removing the hot or cold source, the internal nerve tissue is likely damaged.

Gum Swelling & Abscesses

Tender, inflamed, or darkened gums around the localized area. A small pimple-like bump (known as a fistula or abscess) may develop on the gum, occasionally discharging a fluid that leaves a bad taste in your mouth.

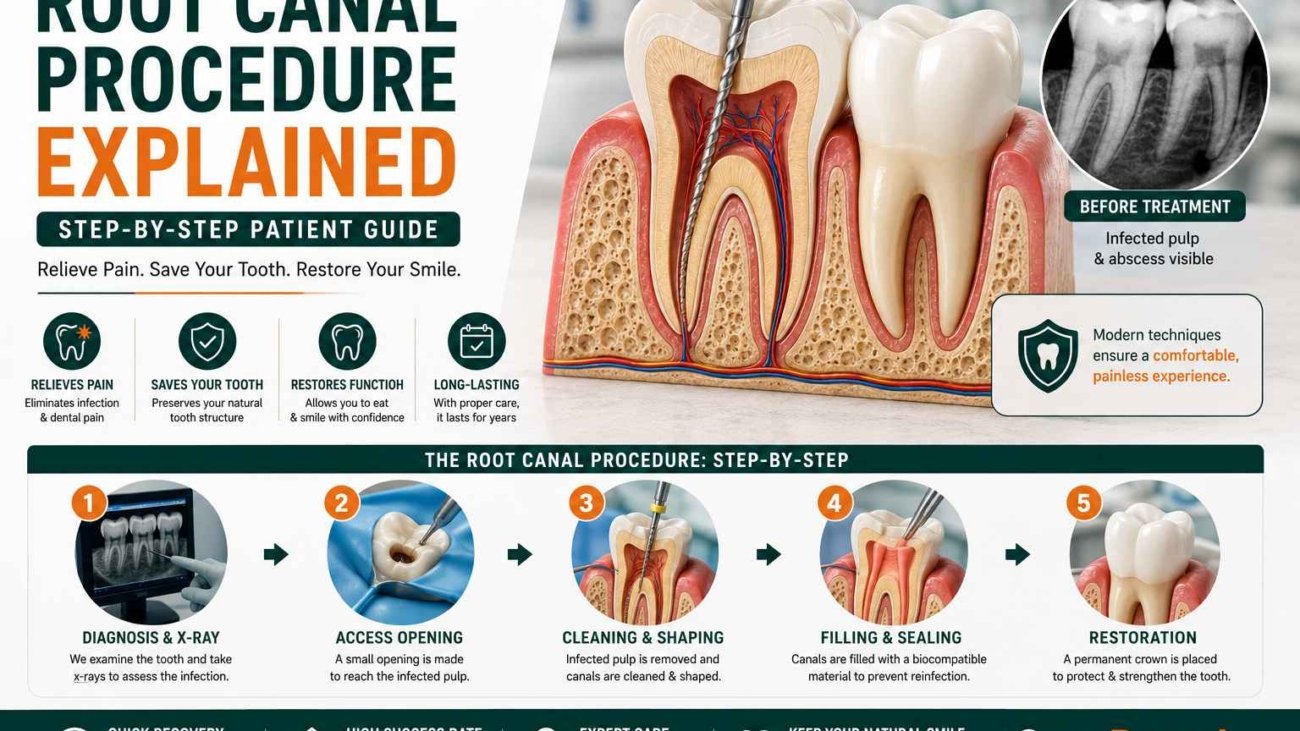
2. The Root Canal Procedure: Step-by-Step Breakdown

A root canal procedure is standard, predictable, and typically completed in one or two short visits. Understanding the individual stages can help ease any anxiety you might feel before your appointment:

  • Step 1: Clinical Imaging & Setup: Your dentist takes detailed digital x-rays to map out the shape of the root canals and check for infection in the surrounding jawbone. Next, a numbing gel is applied to the gums, followed by local anesthesia to fully numb the tooth. A small sheet of protective rubber (a dental dam) is placed around the tooth to keep it dry and completely free of saliva during treatment.
  • Step 2: Accessing the Infected Chamber: Using a precision high-speed handpiece, the dentist makes a tiny opening in the top biting surface of a molar, or behind a front tooth. This provides clean access into the damaged pulp chamber.
  • Step 3: Removing the Pulp & Cleaning the Canals: The endodontist uses a sequence of tiny, flexible instruments called endodontic files. These files sweep away the dead pulp tissue and gently shape the internal root paths. The empty spaces are continuously flushed out with antimicrobial solutions (like sodium hypochlorite) to kill any remaining bacteria.
  • Step 4: Sealing & Filling the Tooth: Once the canals are fully sanitized and dried, they are filled with a rubber-like material called gutta-percha, mixed with an adhesive sealer to completely close off the canals. A temporary filling is placed over the access hole to protect the tooth until your permanent crown is ready.
  • Step 5: Final Restoration (The Crown): Because a tooth without a living root becomes more brittle over time, you will return in a week or two to have a permanent custom porcelain crown fitted. This fully restores the tooth’s structural strength, allowing you to chew normally.

3. Pain Management & Anesthesia Realities

Is a Root Canal Painful?

The most common myth about root canals is that they are intensely painful. In reality, modern local anesthetics ensure that the procedure feels no different than getting a standard cavity filling.

The actual procedure does not cause pain—it actively removes the inflamed, throbbing nerve tissues that caused your toothache in the first place, providing immediate relief.

What to Expect Post-Treatment

After the local anesthesia wears off, you may experience mild, dull sensitivity or tenderness in the surrounding gums for 2 to 4 days. This is a normal healing response as the deep bone tissues settle.

This temporary discomfort can be easily managed with standard over-the-counter anti-inflammatory medications like Ibuprofen or Paracetamol.

4. Essential Materials Used in Endodontics

Endodontic therapy relies on specialized materials to ensure the empty canals stay completely sealed and free of bacteria for years to come:

Endodontic Material Clinical Purpose Biological Advantage Provided
Gutta-Percha Points A natural, rubber-like thermoplastic material inserted to fill empty canals. Biocompatible and flexible; easily fills complex root shapes without irritating the body.
Bioceramic Root Sealers A medical cement used to secure gutta-percha points inside the canals. Creates a tight, waterproof seal that actively prevents new bacteria from entering.
Sodium Hypochlorite An antimicrobial liquid used to flush and wash out root systems. Dissolves organic debris and sanitizes tiny side branches that tools cannot reach.
Composite Resin A tooth-colored temporary material used to fill the crown access hole. Protects the inner filling material from food particles until a permanent crown is placed.

🔍 Clinical Insight: Accurate diagnosis is essential before any endodontic procedure. Explore our detailed guide comparing modern digital imaging options like how dental x-ray sensors work to see how dentists check for underlying bone abscesses safely.

5. Post-Treatment Recovery & Aftercare Protocols

Protecting your treated tooth while it waits for a permanent crown ensures a smooth recovery and guards against structural damage:

  • Avoid Hard Chewing: Do not chew hard foods on the treated side of your mouth until your permanent crown is cemented. The temporary filling material is soft and can wear down or crack under heavy pressure.
  • Maintain Routine Hygiene: Continue brushing and flossing all your teeth normally. Be extra gentle around the treated tooth when sliding dental floss out from between the teeth so you don’t catch and pull out the temporary filling.
  • Watch for Abnormal Signs: While mild soreness is expected for a few days, contact your dentist if you notice visible swelling in your face or cheek, or experience a return of severe, throbbing pain.

6. Frequently Asked Questions (FAQ)

How many appointments are required to complete a root canal?

Most standard root canals can be completed in a single visit lasting 45 to 90 minutes. If the tooth has a severe, long-term infection, your dentist may place a localized medication inside the canal and wait a week before sealing it at a second appointment.

Is it better to get a root canal or extract the tooth instead?

Saving your natural tooth is always the preferred choice. Keeping your original tooth preserves your natural biting strength and prevents neighboring teeth from shifting out of alignment. Extractions often require more complex, expensive replacements like dental implants or bridges later on.

Can a tooth that has had a root canal get a cavity in the future?

Yes. While the interior of the tooth is sealed and can no longer feel pain, the outer enamel margins around the base of your new crown can still develop decay if plaque is allowed to build up. Routine brushing and professional cleanings remain essential.

Equip Your Practice with Premium Endodontic Supplies

Performing comfortable, predictable root canal treatments requires precision equipment. From premium rotary files and reliable bioceramic sealers to advanced diagnostic systems, SwatDental offers the high-performance materials your practice needs to deliver exceptional care.

ARTICLE EXECUTIVE SUMMARY

This patient education page clarifies the root canal procedure, explaining how modern techniques remove infected pulp tissue and seal the tooth to preserve your natural smile comfortably.

CLINICAL EDUCATION DISCLAIMER

The information provided here is for educational use and should not replace professional diagnosis. If you are experiencing severe dental pain or swelling, please consult a qualified dentist immediately.

© 2026 SwatDental. All rights reserved. | Professional Endodontic Standards | Supply Platform Assets


Dental implant care guide

Dental Implant Care Guide: Complete Post-Op & Long-Term Maintenance


Dental Implant Care Guide: Complete Post-Op & Long-Term Maintenance


CLINICAL PATIENT EDUCATION

Dental Implant Care Guide

An exhaustive roadmap for protecting your surgical investment, featuring immediate post-op protocols, long-term oral hygiene systems, and preventative complication analysis.

📅 Updated: June 2026
⏱️ 14-16 Min Read
✓ Clinical Board Approved

What Are Dental Implants & Why Care Matters

Dental implants are the gold standard for tooth replacement. Unlike superficial bridges or removable dentures, a dental implant utilizes a biocompatible titanium post surgically anchored into your jawbone. Over time, a structural fusion process known as **osseointegration** locks the bone directly to the implant surface, providing a root-like base for a porcelain crown. While dental implants cannot get cavities, their long-term survival relies entirely on the surrounding gum and bone tissue. Without strict care, bacteria can accumulate, leading to peri-implantitis (gum disease around the implant) and eventual bone loss. This comprehensive dental implant care guide outlines exactly how to preserve your smile at every stage of healing and lifestyle wear.

1. Immediate Post-Surgery Care (First 24-48 Hours)

The initial 48 hours following dental implant placement are crucial for stabilization and blood clot formation. Your body is initiating a deep healing response, and minimizing site irritation is key to preventing early complications.

Pain Management

Take prescribed or over-the-counter anti-inflammatory medications (such as Ibuprofen) before the surgical anesthesia wears off completely. Consistent dosing during the first 48 hours regulates systemic swelling and nerve discomfort effectively.

Swelling & Bleeding Control

Apply cold compress ice packs to the side of your face continuously using a 20-minutes-on, 20-minutes-off rotation. Keep steady pressure on the surgical site by biting down gently on damp sterile gauze packs for the first hour post-op.

Rest & Activity Restrictions

Avoid intense aerobic exercise, heavy lifting, or running for at least 48 hours. Elevate your head with an extra pillow when sleeping to lower local blood pressure at the surgical site, preventing throbbing sensations and bleeding.

2. First Week After Implant Surgery

As you enter days 3 through 7, your soft tissues begin adapting to the new implant hardware. While acute pain should start to fade, maintaining clean tissue surfaces without disrupting the surgical stitches remains essential.

  • Oral Hygiene During Healing: Do not brush directly over the surgical wound for the first 4 days to avoid fraying the stitches or opening the incision line. Brush your remaining teeth normally. On day 3, start warm salt water rinses (1/2 teaspoon of salt in a glass of warm water) 4–5 times a day after meals to flush away food debris.
  • What to Eat & What to Avoid: Stick to an ultra-soft or liquid-heavy diet. Nutritious choices include protein shakes, lukewarm pureed soups, Greek yogurt, mashed avocados, scrambled eggs, and smoothies. Avoid crunchy chips, crusty bread, or seeds that can get trapped under gum flaps.
  • Signs of Infection to Watch: Monitor the site daily. It is normal to see mild oozing or swelling peak on day 3, but you should contact your dentist immediately if you experience a foul, pus-like taste, sudden severe throbbing pain that medication cannot control, or a fever above 101°F (38.3°C).

3. Daily Implant Care Routine & Techniques

Once your gums have completely healed and your permanent porcelain crown is attached, your maintenance focus shifts to long-term care. Plaque biofilm can accumulate on implant crowns just like natural teeth, requiring a dedicated daily hygiene routine:

Advanced Brushing Techniques

Brush at least twice a day using a soft-bristled manual toothbrush or an electric sonic toothbrush. Angle the bristles at a 45-degree angle toward the gumline where the crown meets the tissue. Roll the bristles gently into the crevice to sweep out hidden bacteria, cleaning all interior, exterior, and biting surfaces thoroughly.

Flossing Around Implants

Flossing around an implant is slightly different than a regular tooth. Wrap specialized implant floss completely around the neck of the crown, cross the strands in front, and slide it up and down in a gentle shoe-shine motion. This cleans the entire circular base without pushing too hard against the delicate gum seal below.

4. Dietary Parameters & Chemical Restrictions

Your diet directly affects both the initial healing of your implants and the long-term structural integrity of the ceramic crown material. Adjust your habits based on these key guidelines:

  • Hard & Sticky Foods: Do not chew hard ice cubes, unpopped popcorn kernels, hard candies, or tough nuts. These can crack porcelain surfaces and stress the underlying bone structure. Limit sticky caramels or gummy candies, which pull on implant structures and trap sugars in hard-to-reach areas.
  • Hot Foods During Healing: Avoid piping hot coffee, boiling teas, or spicy dishes for the first 5 days post-surgery. High temperatures cause local blood vessels to expand, which can disrupt healing clots and cause the surgical wound to bleed again.
  • Alcohol & Smoking Impact: Avoid alcoholic drinks for at least 72 hours post-op, as alcohol thins the blood and interferes with pain medications. Most importantly, avoid smoking or vaping for at least 6 to 8 weeks. Nicotine restricts capillary blood flow to the gums, significantly slowing down bone integration and increasing the risk of early implant failure.

5. Essential Care Products & Equipment Recommendations

Standard grocery-store oral care items can sometimes be too abrasive for dental implant materials. Using the right specialized tools keeps your restoration clean without scratching its smooth surfaces:

Product Classification Recommended Clinical Attributes Key Health Benefit Provided
Specialized Implant Floss Thick, spongy, woven thread designs with stiff plastic threader tips. Sweeps away food particles around deep margins without tearing.
Non-Abrasive Toothpaste Low RDA (Relative Dentin Abrasivity) value gels; **free of charcoal or baking soda**. Cleans thoroughly without scratching the smooth porcelain glaze or exposed metal parts.
Antimicrobial Mouthwash Alcohol-free formulas containing Zinc, Essential Oils, or Chlorhexidine. Controls harmful bacteria populations without drying out or irritating healing oral tissues.
Interdental Brushes Flexible, plastic-coated wire heads with soft, small nylon bristles. Easily cleans wide gaps underneath dental implant bridges without scratching titanium parts.

🔍 Understanding Your Oral Health: Want to see how dentists check your implant’s bone stability using ultra-low dose direct imaging tech? Explore our full guide explaining how dental x-ray sensors work to learn about high-definition bone visualization.

6. Long-Term Implant Maintenance Systems

Excellent home care is a fantastic start, but maintaining your dental implants long-term requires partnership with your dental professional. Overlooking routine office appointments can allow hidden deep-tissue issues to go unnoticed:

  • Regular Dental Checkups: Schedule professional exams at least every 6 months. Your dentist will evaluate the clinical stability of the implant connection, assess neighboring teeth, and ensure your bite forces are balanced across all structures evenly.
  • Professional Cleanings: Dental hygienists use specialized ultrasonic tips or hand scalers made from carbon fiber or rigid plastic. These tools clean under the gumline without scratching or scraping the titanium implant components.
  • Yearly Monitoring: Your dentist will take yearly low-dose digital x-rays to track bone levels around the implant threads, ensuring the osseointegration bond remains strong and healthy.

7. Common Implant Problems & Solutions

Recognizing early signs of implant irritation allows your dental team to intervene and correct the issue before it leads to serious complications. Watch for these common warning signs:

Loose Implants

If you notice a slight movement or wiggle when chewing, contact your doctor right away. Often, the internal titanium abutment screw holding the crown has simply loosened over time. Your dentist can easily retighten it to the proper torque settings.

Gum Recession Around Crowns

Gums can pull back due to heavy biting forces or overly aggressive brushing. If you notice exposed dark metal margins, your hygienist can adjust your brushing technique or recommend soft-tissue therapy to protect the area.

Bone Loss Warning Signs

Persistent bleeding, deep pocket swelling, or chronic dull pain can indicate early peri-implantitis bone loss. Dentists treat this with deep antibiotic flushes, localized laser therapies, or modern bone grafting techniques.

8. How Long Do Implants Last? Lifespan Analysis

With proper care and maintenance, the titanium base of a dental implant can last **25 years to a lifetime**. The superficial porcelain crown attached to the top handles daily chewing wear and tear, and typically needs replacement or maintenance every 10 to 15 years.

Your implant’s actual lifespan depends on key factors like your overall systemic health (such as controlled blood sugar levels), avoiding grinding habits (bruxism) by wearing an evening nightguard, and consistency with your home hygiene routine. Protecting the surrounding bone ensures your implants remain stable for decades.

9. Frequently Asked Questions

Can I use a standard water flosser tool around my dental implants?

Yes, water flossers are excellent tools for cleaning implants. Use them on a low-to-medium pressure setting and point the tip at a 90-degree angle to flush out food particles from wide spaces under bridges or crowns safely.

Why is smoking considered dangerous after dental implant surgery?

Nicotine narrows the small blood vessels in your gums, reducing the oxygen and nutrients delivered to the healing bone. This significantly slows down the osseointegration process, increasing the chance of early implant failure.

What should I do if my implant crown breaks or cracks?

Avoid chewing on that side of your mouth and schedule an appointment with your dentist. The titanium root post is likely safe beneath the gum; your dentist can easily unscrew the broken crown and replace it with a fresh porcelain restoration.

Find High-Quality Dental Implant Care Supplies

Protecting your dental implants requires the right specialized hygiene tools. From ultra-soft toothbrushes to gentle, plastic-coated interdental brushes and premium oral care kits, SwatDental provides the high-quality supplies your practice or home care routine needs.

ARTICLE EXECUTIVE SUMMARY

This comprehensive care guide outlines the required hygiene protocols, post-surgical timelines, and daily maintenance habits needed to prevent peri-implant disease and ensure dental implants last a lifetime.

CLINICAL INFORMATION DISCLAIMER

This care guide is for educational purposes and should not replace personalized medical advice from your oral surgeon or dentist. Always follow your provider’s specific post-operative instructions.

© 2026 SwatDental. All rights reserved. | International Dental Technology Standards | Practice Platform Assets